Goals
3d avatars are increasingly used for platforms such as social media, virtual assistants, and digital worlds. They provide a digital representation, allowing for immersive experiences for users.
The primary goal of this project is to create avatars that represent different users within a shopping application. This is achieved by providing a variety of customization options which can be dynamically changed over time. This provides users with the ability to create their own personal brand through the avatars created.
Avatars needed to give off a warm and inviting appearance for new users. This is accomplished by providing users with customizable components composed of rounded shapes with warm, high contrast colors.   
Avatars can be used by both consumers and retailers. For retailers custom avatars can be created that promote products or advertise a sale in effect. The commercial avatar created can also be used to represent the company branding.
UX Process
The diagram below shows the overall process for this project. Each section is explained in further detail below.
Background
The initial idea for this project was to create a mapping or guidance application for large physical malls. After some research it was found that there was already existing solutions implemented that focused on 3D mall navigation. Priorities then shifted to focusing on improving customer experience and providing more personalization options to mall experiences.
Interview and Survey Data
User interviews were conducted virtually and in-person on topics such as personalized profiles/avatars, digital shopping assistance, shopping habits or shopping platforms and data collection for a better shopping experience. In addition, store employers and employees were contacted for their opinions regarding tracking user preferences, in-app marketing, store promotion opportunities, accessibility and services provided.
The main findings gathered were that:
1. People want to know efficient routes to purchase products
2. People want to be up to date with the latest trends
3. People want quality personalized services
4. People want to be able to plan or reserve products ahead of time
5. People like incentives to continue purchases
User Research
Interview data findings were organized into an Affinity Diagram as well as an Empathy Map. These diagrams helped to determine common user problems and narrow down the target audience for the application.
Three affinity diagrams were made based on the interview information gathered. They are ideal shopping app ideas, application layout and profiles/digital avatar.
Following this an empathy map was created to represent common user opinions, pain points and opportunities for shopping. 

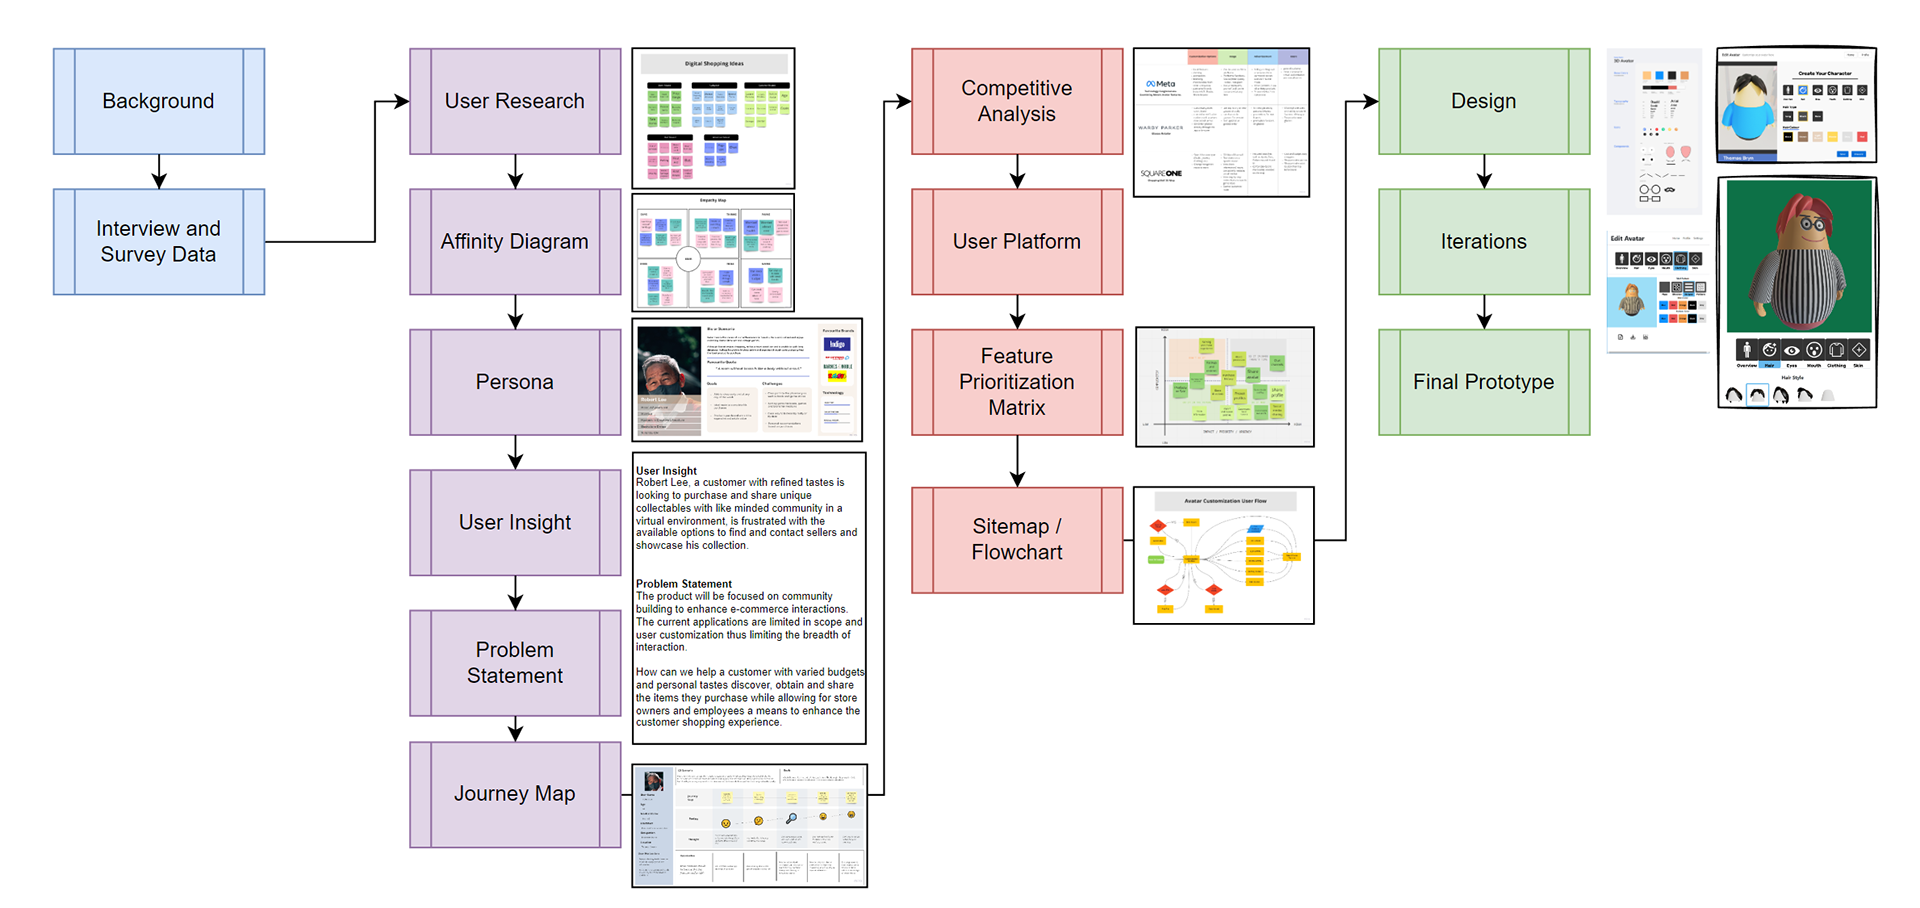
Application Layout Affinity Diagram

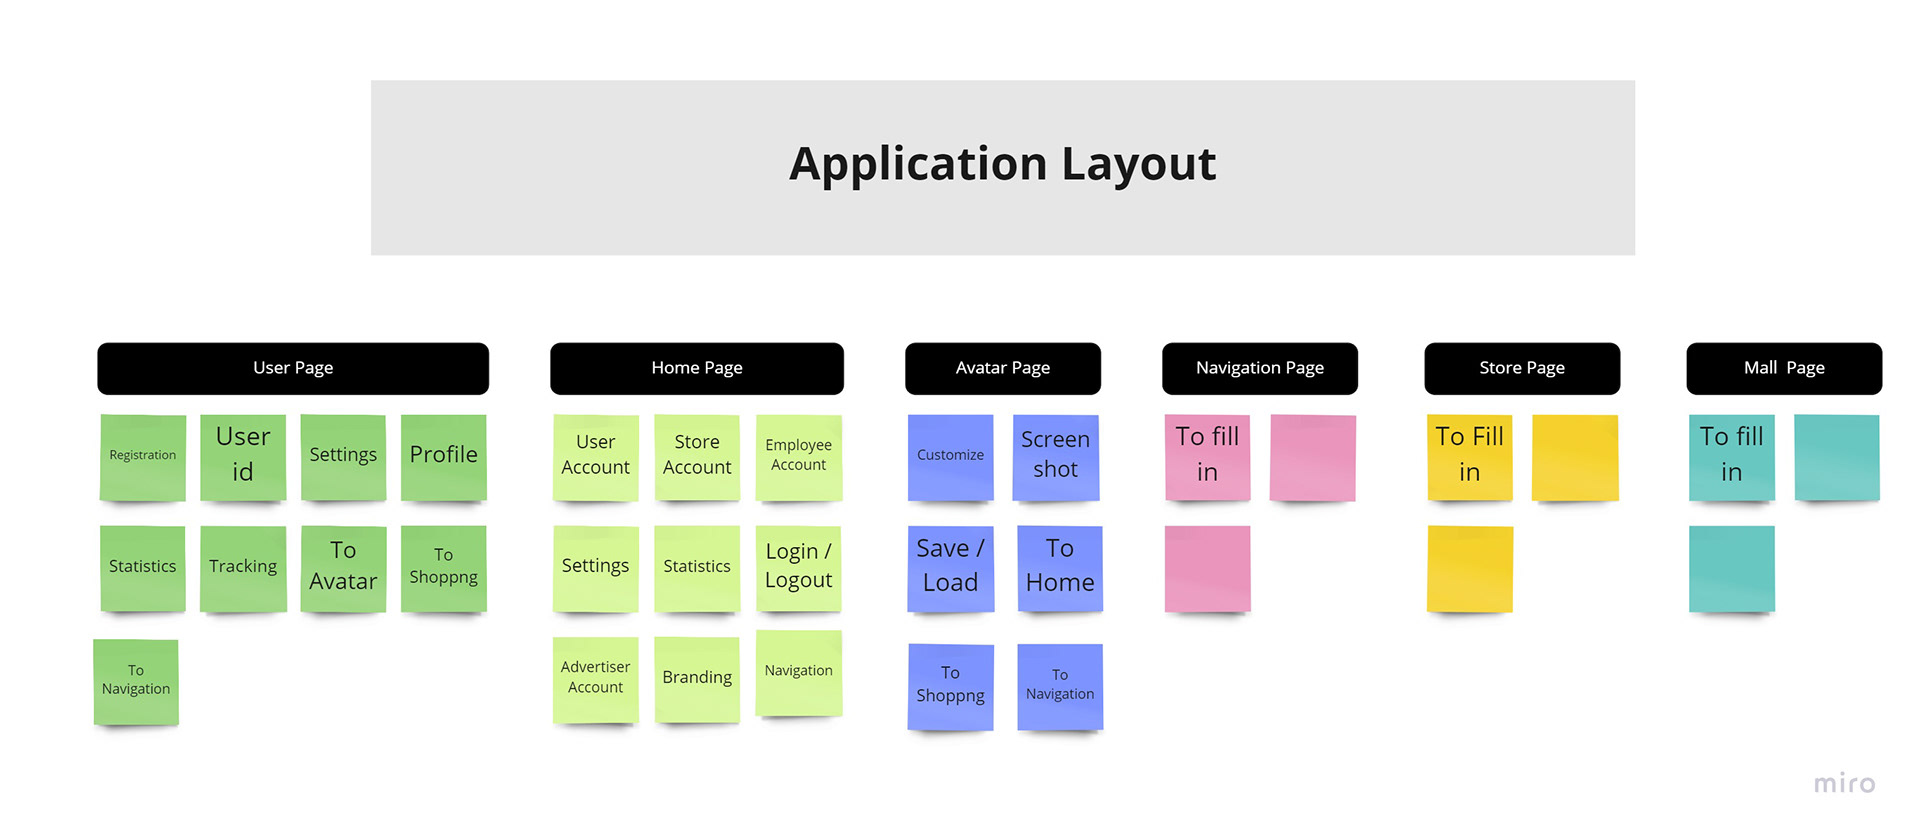
Avatar Components and Ideas Affinity Diagram

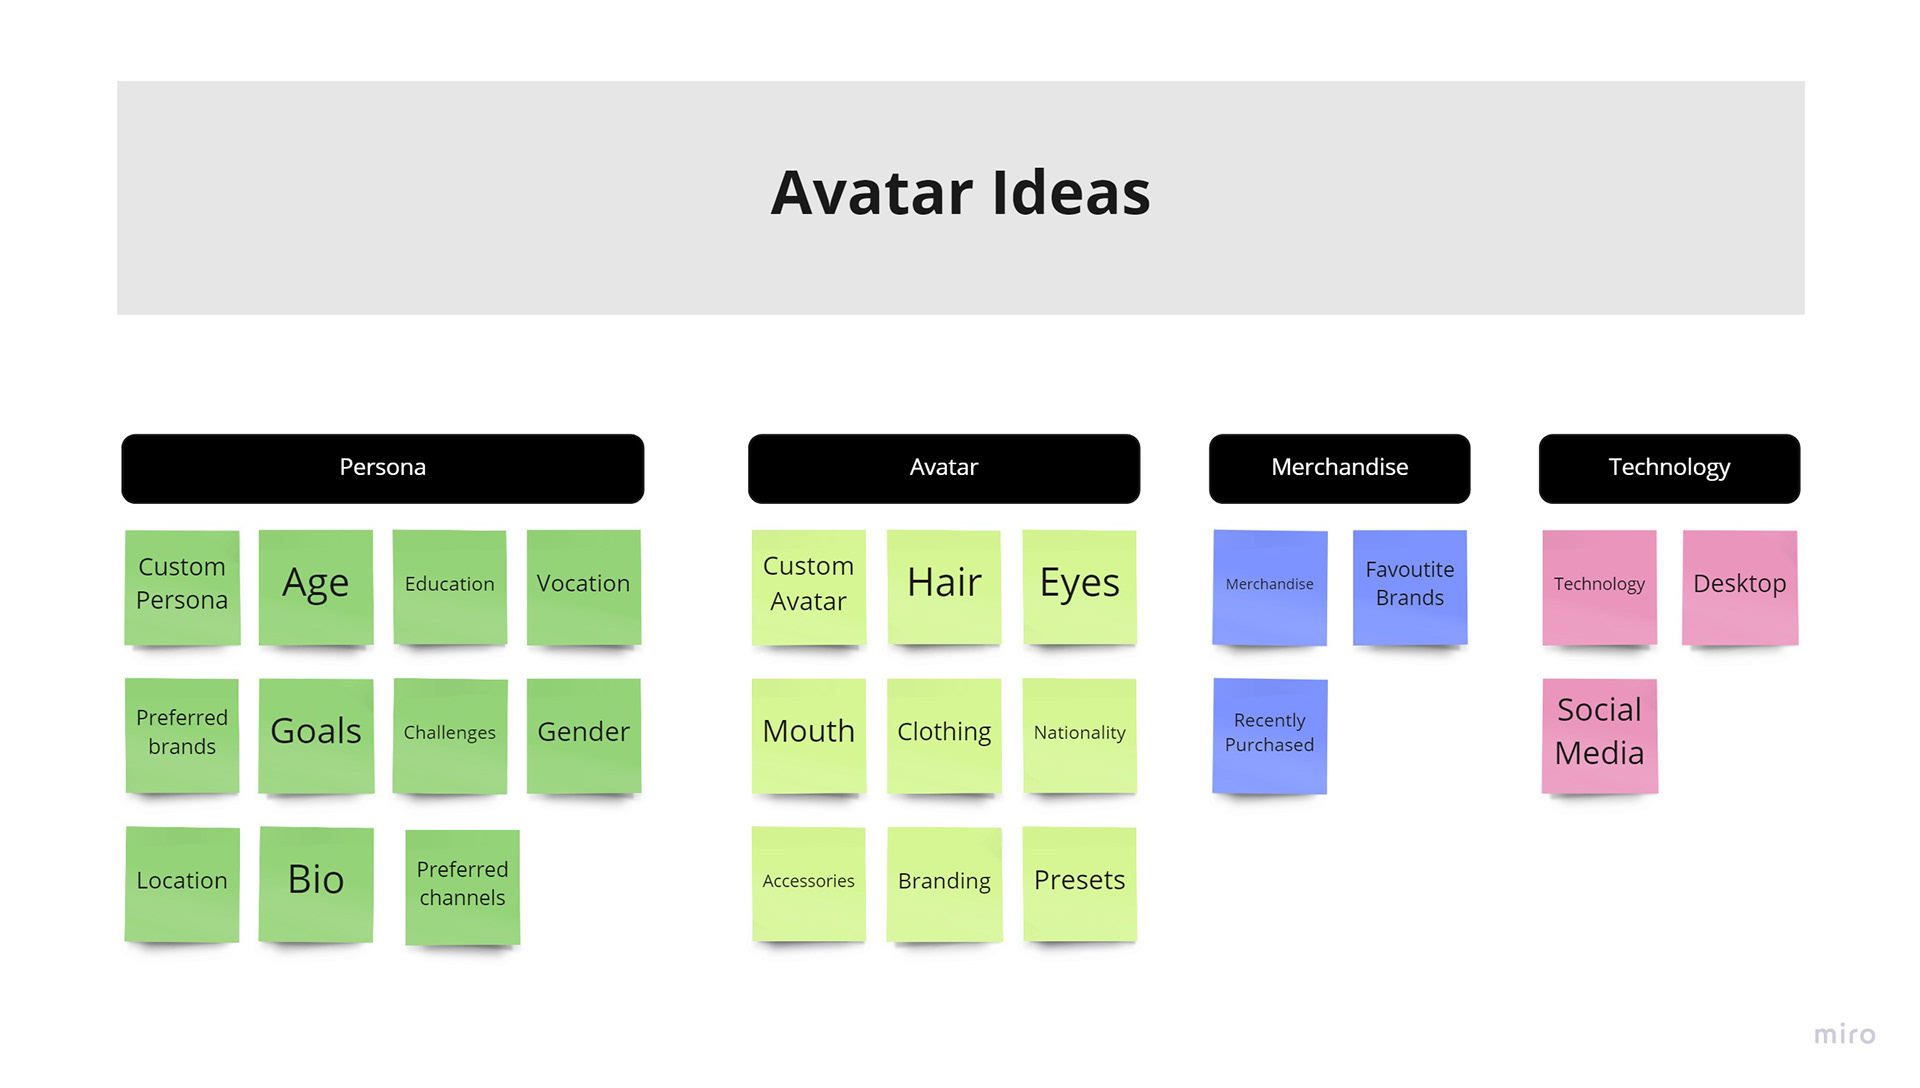
Shopping Application Ideas and Channels Affinity Diagram

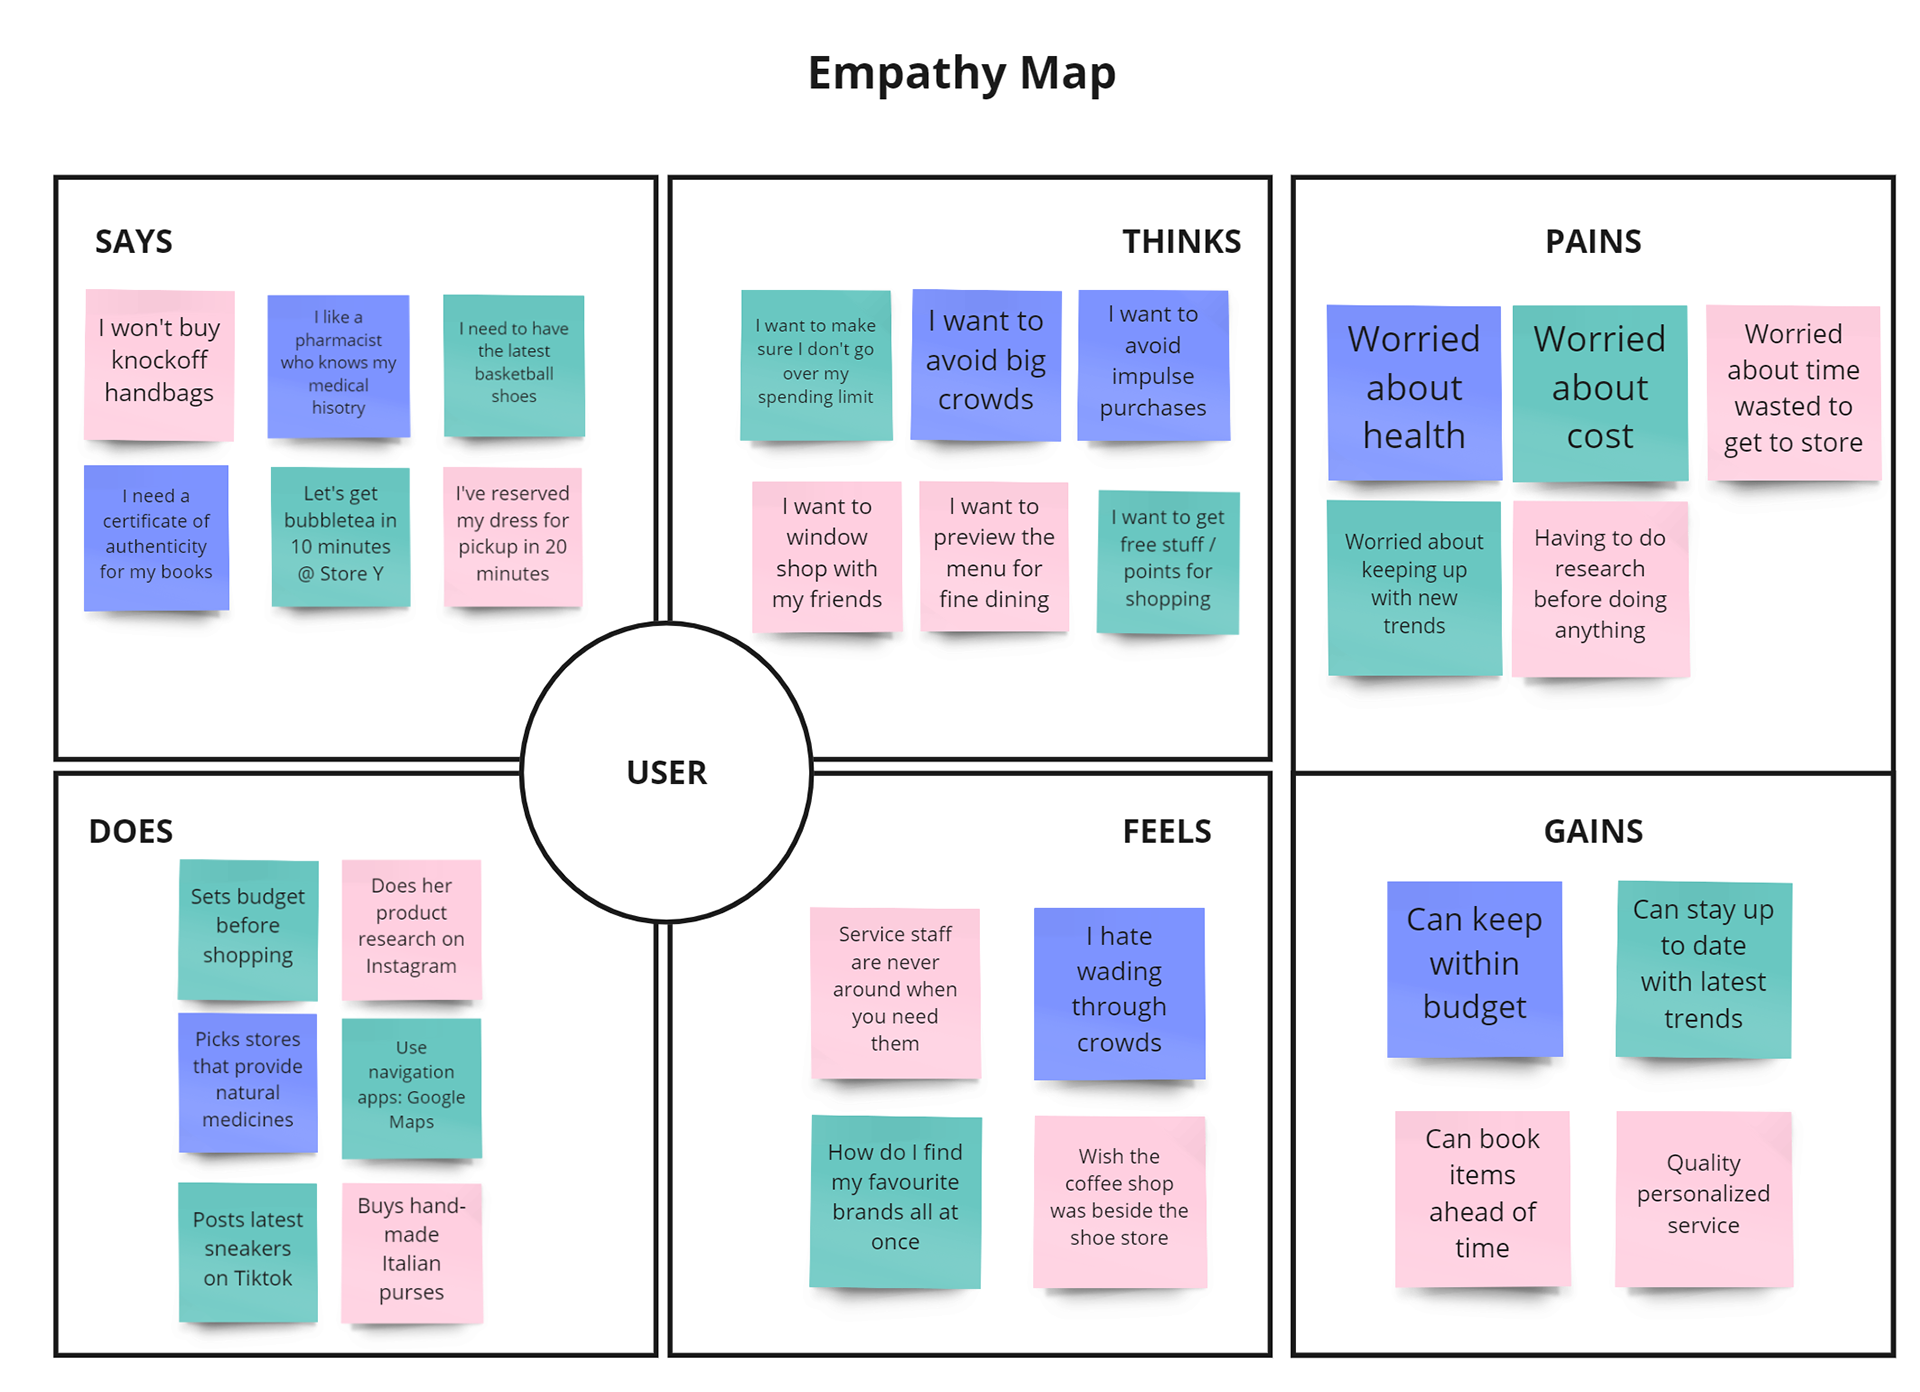
Empathy map summarizing user thoughts on shopping navigation, convenience, cost

User Persona
Personas were created to gain a better understanding of target demographics and individual user needs. The persona was created based on the data from user interviews, the affinity diagram and the empathy map. 
Robert Lee has recently discovered app which provides access to a retailer which is selling vintage historical books. He is the owner of a bookstore and is semiretired and enjoys classic literature and vintage games and collectables. He is looking for a easy way to talk to the store owners to discuss the history of the book and preview the quality.​​​​​​​

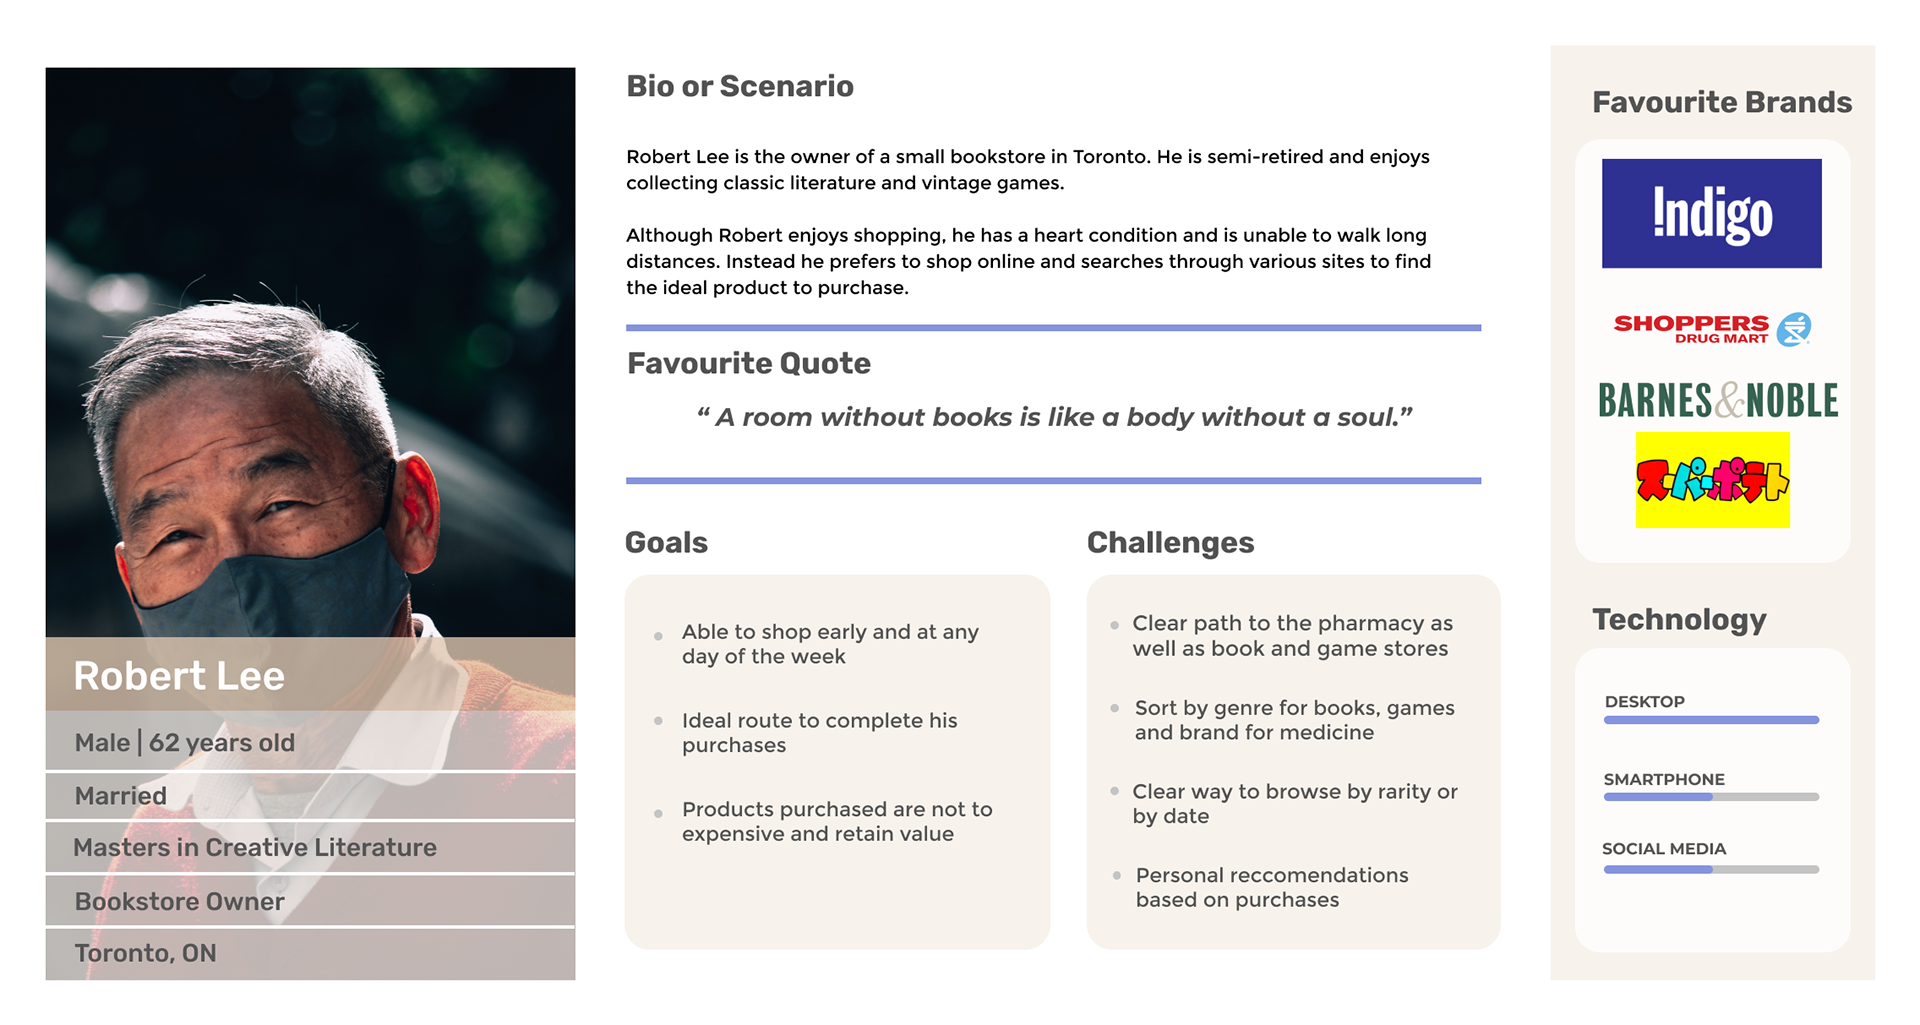
Persona of Robert Lee, who is interested in collecting vintage items in an efficient and timely manner.

A user insight statement and a problem statement were created to reflect user issues and goals.​​​​​​​
User Insight Statement
Robert Lee, a customer with refined tastes is looking to purchase and share unique collectables with like minded community in a virtual environment, is frustrated with the available options to find and contact sellers and showcase his collection.
Problem Statement
The product will be focused on community building to enhance e-commerce interactions. The current applications are limited in scope and user customization thus limiting the breadth of interaction.
How can we help a customer with varied budgets and personal tastes discover, obtain and share the items they purchase while allowing for store owners and employees a means to enhance the customer shopping experience.
User Journey Map
A user journey map was then created to describe Robert's user scenario, convey their internal thoughts and to show how features of the app could be utilized to aid the user.

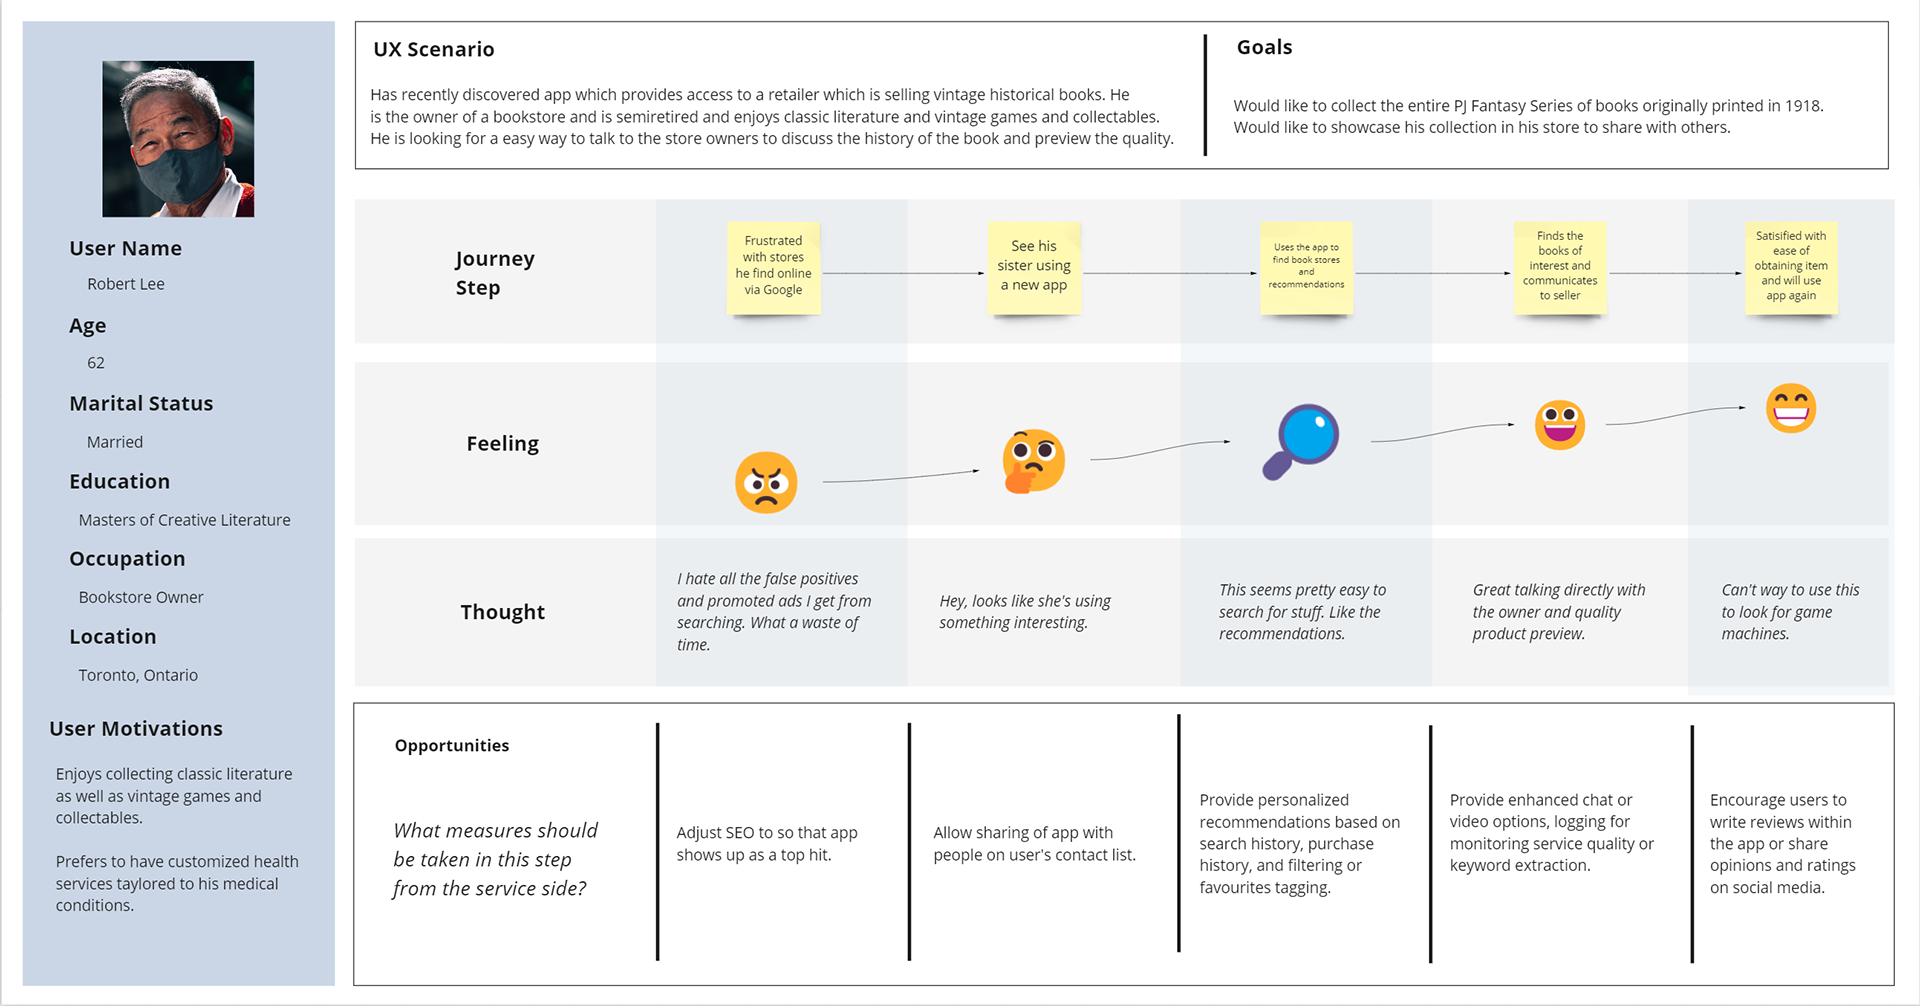
Journey map outlines Robert search for a rare collectible fantasy novel series.

Competitive Analysis
Direct and indirect competitors were analyzed for customization options, main usage, advertisement opportunities and userbase.
These were the main research findings: 
●    There are opportunities to refine digital map information provision as well as avatar customization and sharing options.
●    There are opportunities to tie in customization with digital rewards.
●    Users like apps with simple processes, customizable options and status notifications.

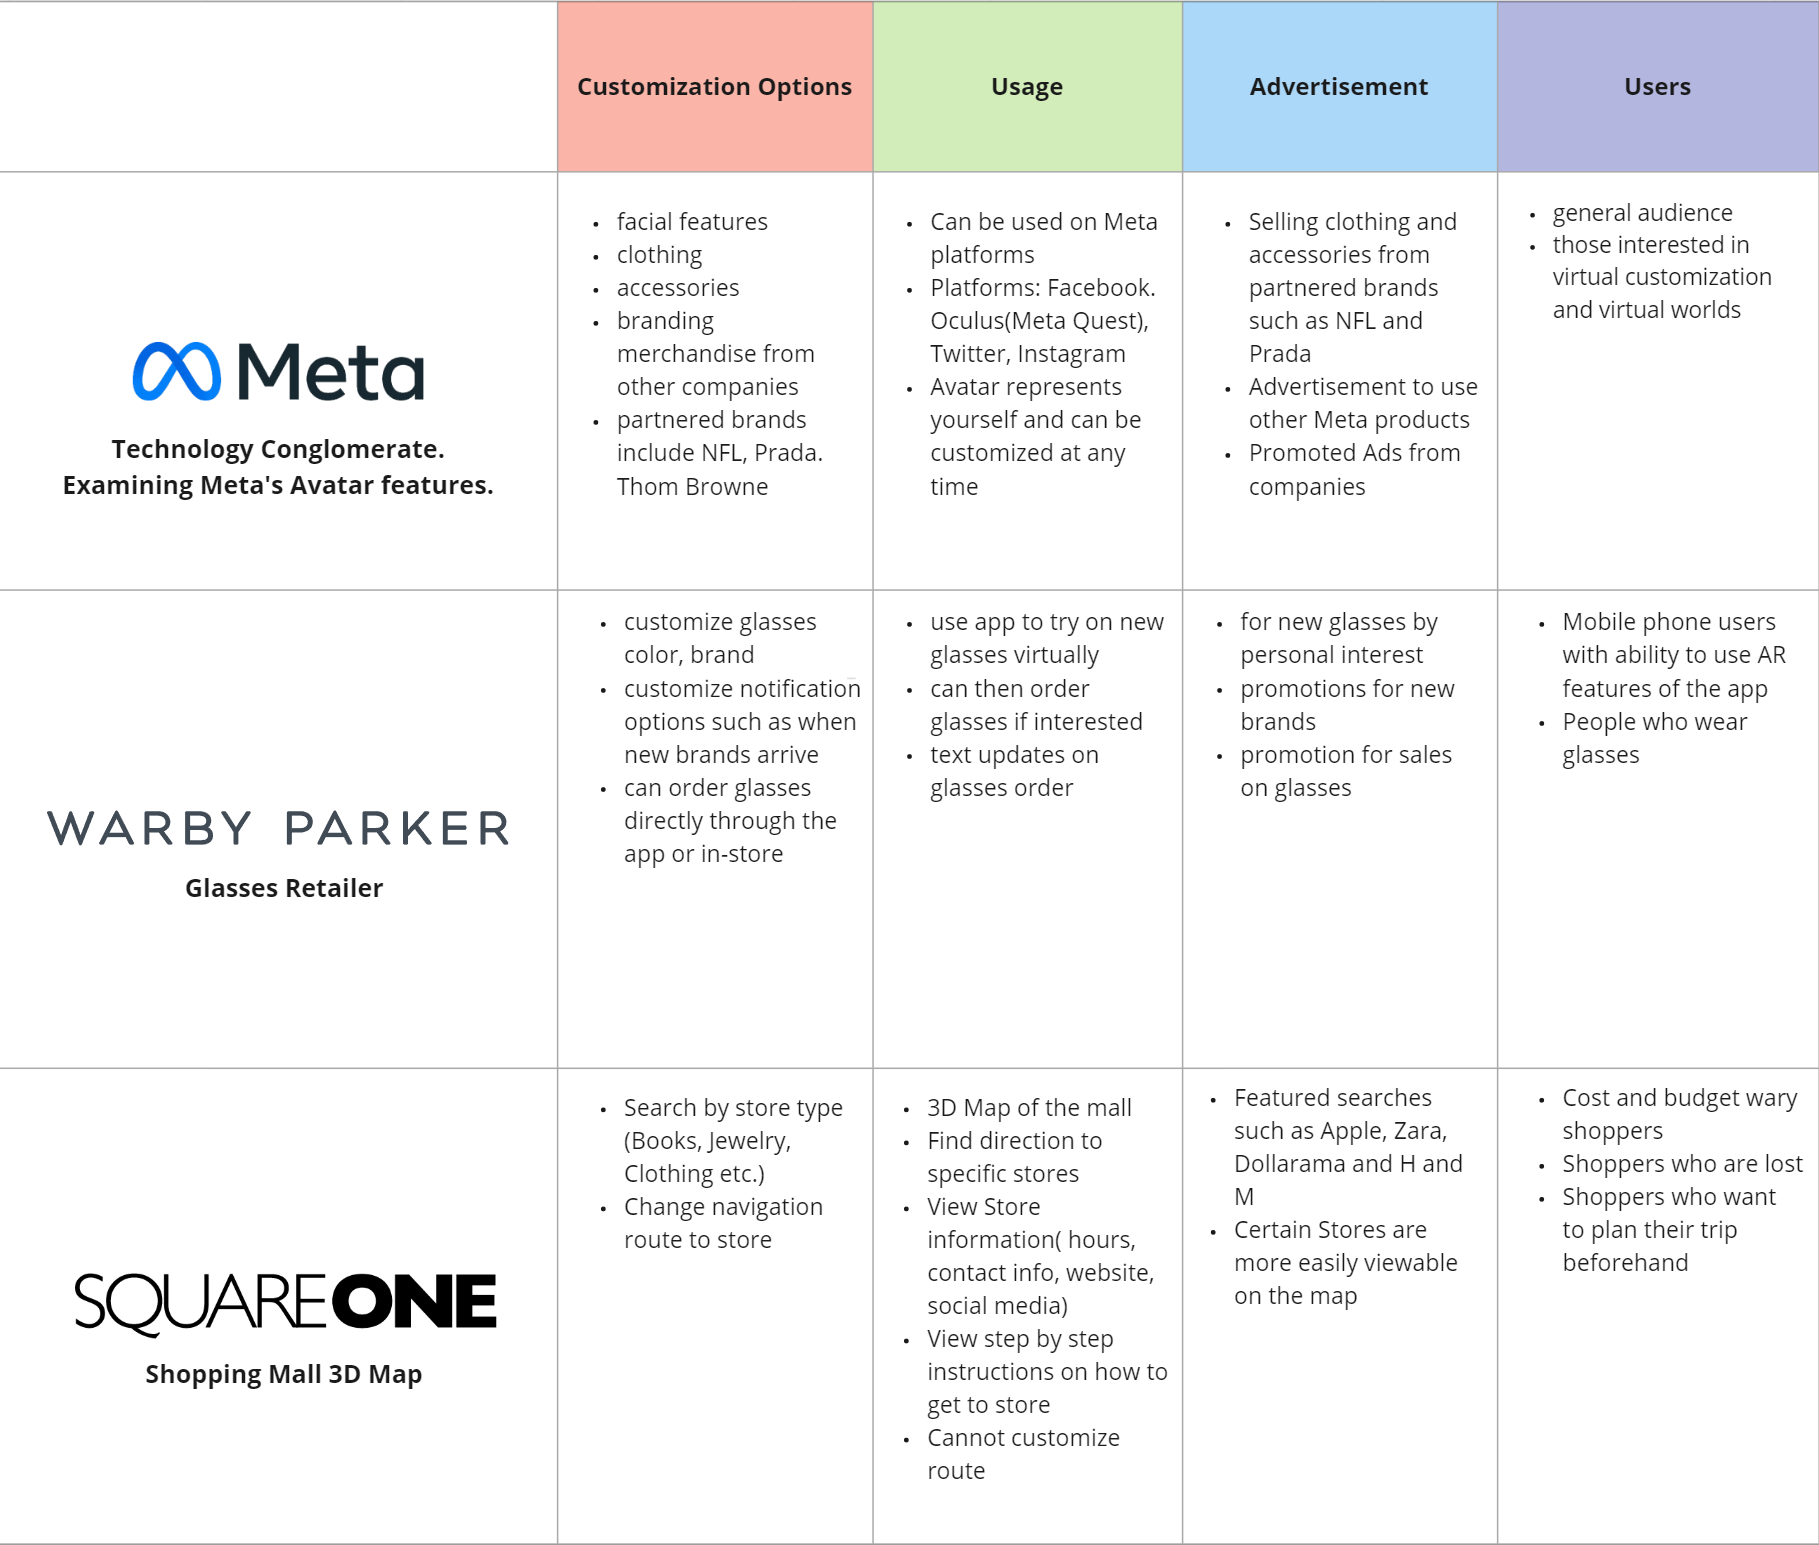
Competitive Analysis Chart

User Platform
Following the initial user research the main application features were defined. First, a value prioritization matrix was created to understand which features should be prioritized.
Following this, the curbside pickup application's main features were defined.
The application would:
1. Allow users to customize their own avatars
2. Allow users to save/load avatars
3. Keep a personal profile that showcases their avatar
4. Allow store owners/employees to create their own custom avatars for advertisement purposes

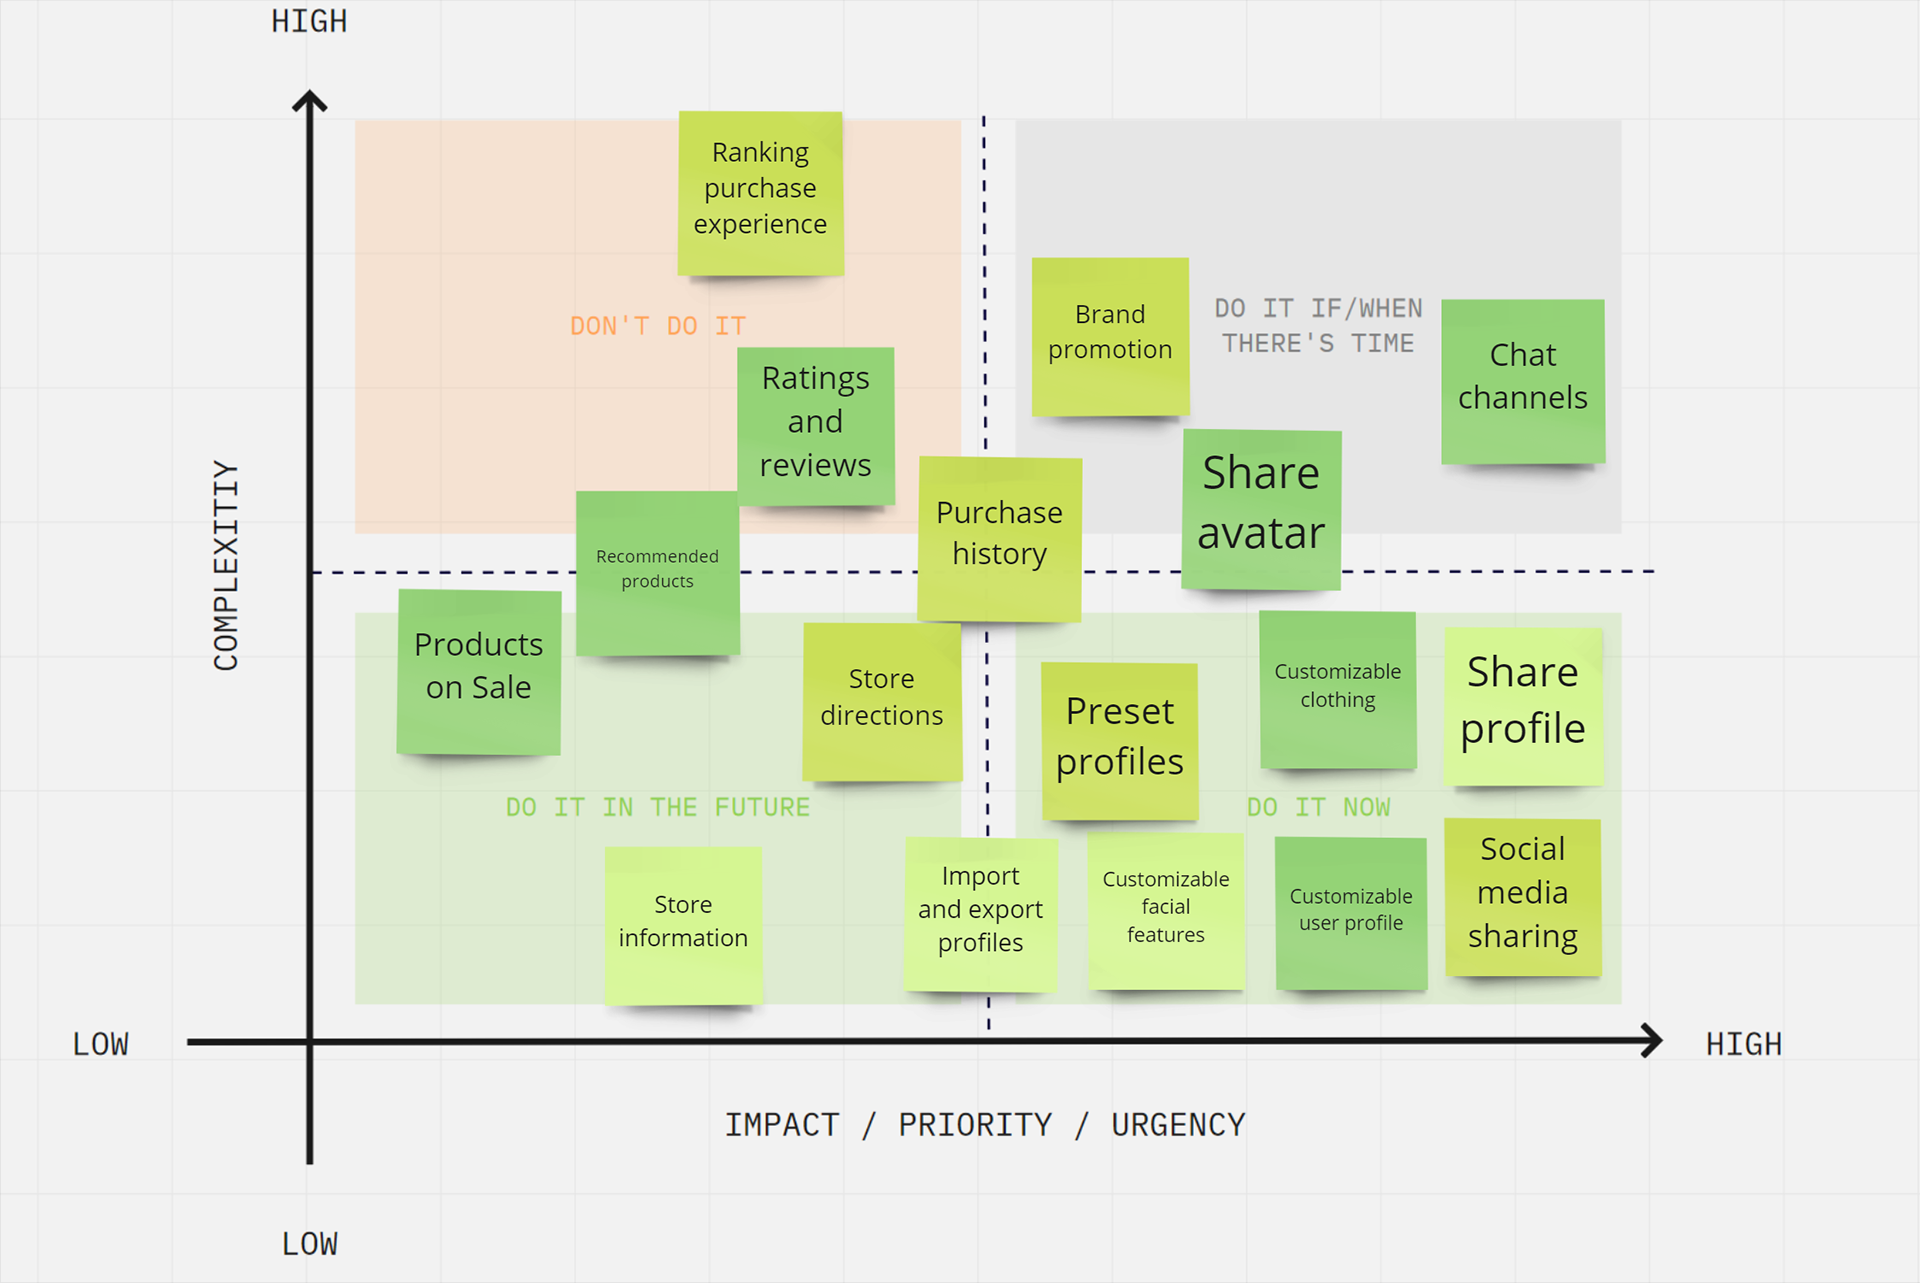
Value Prioritization Matrix
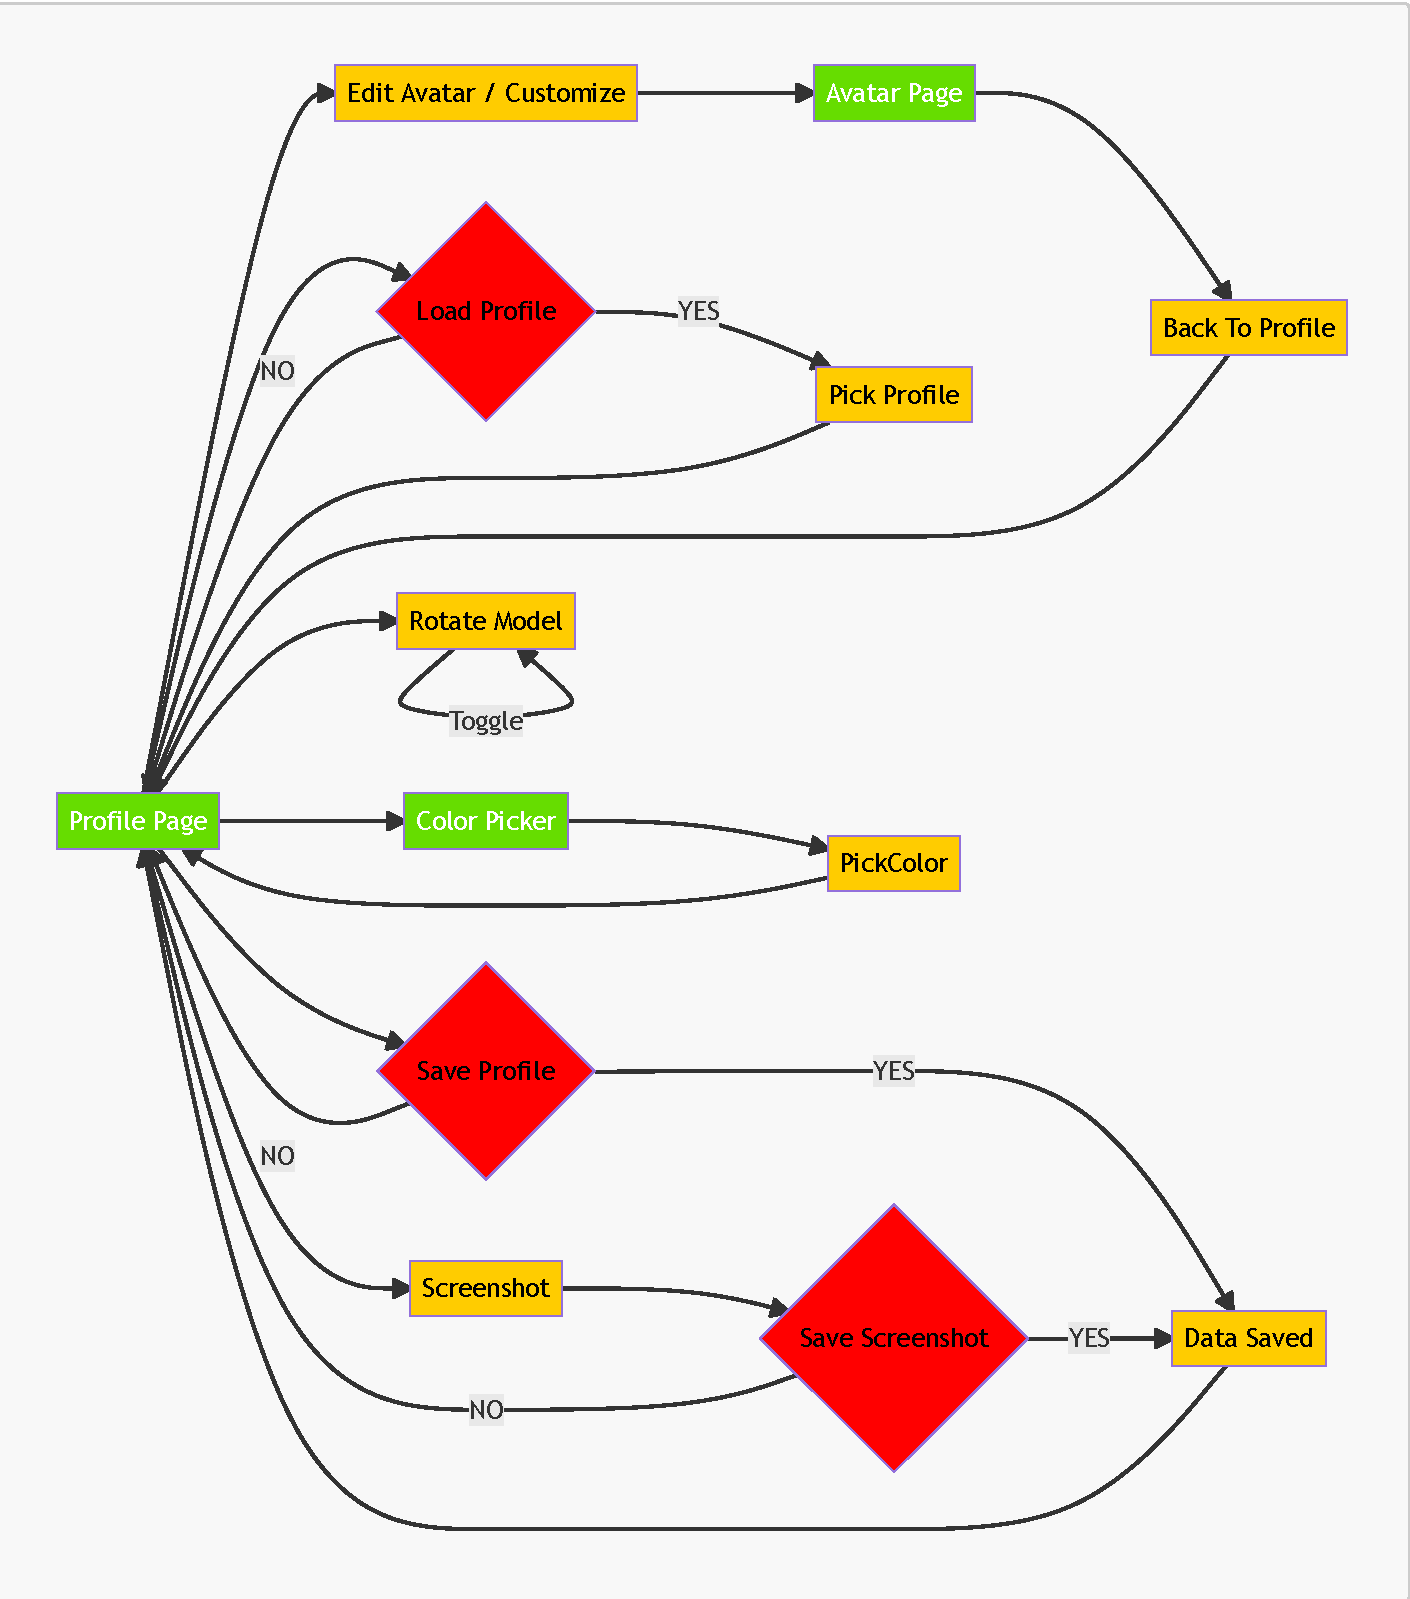
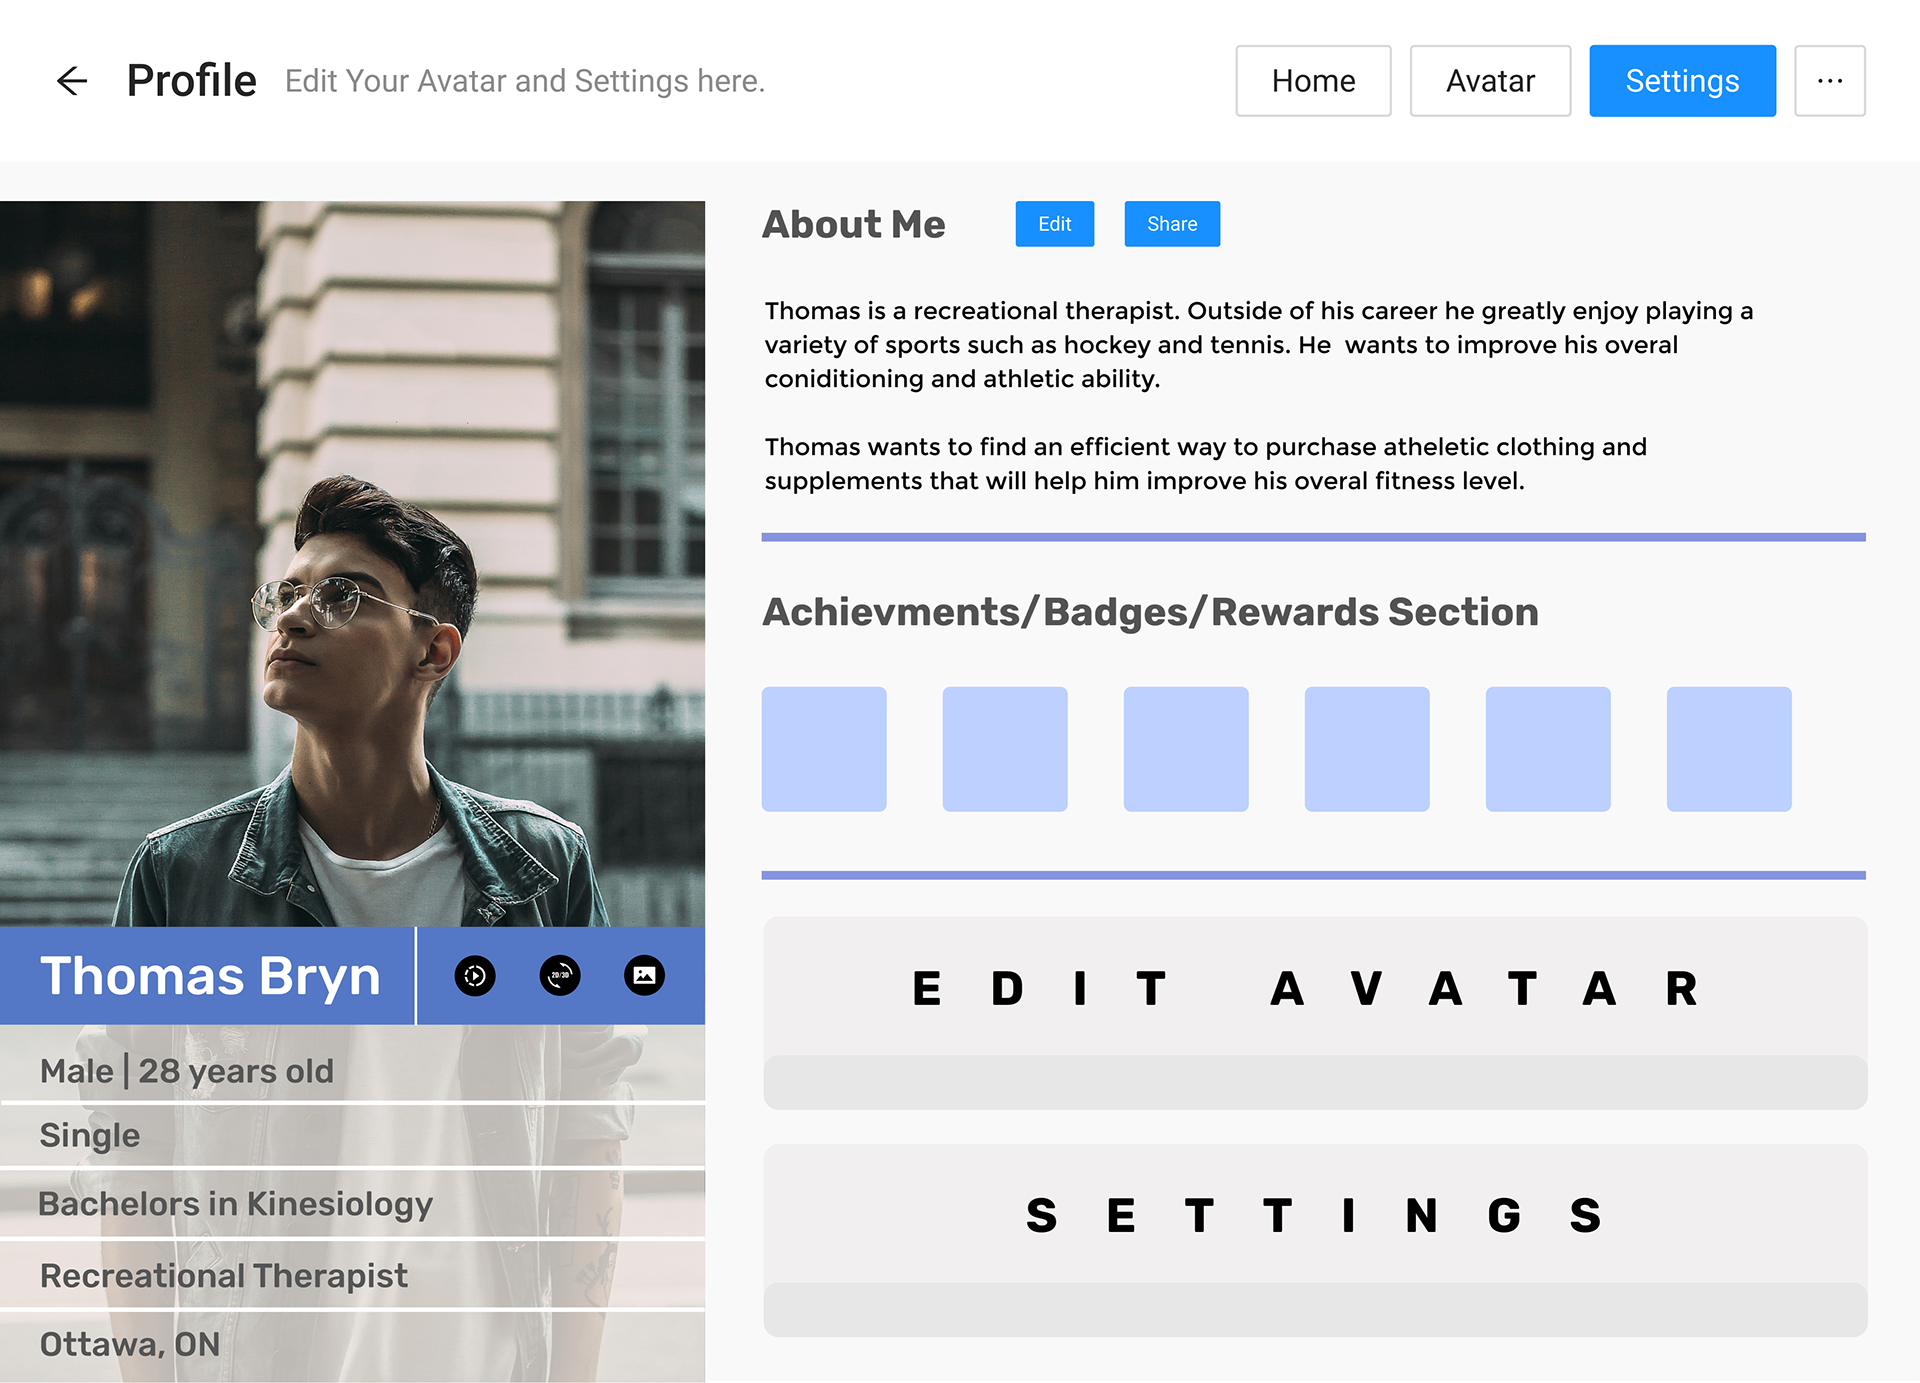
Project Workflows
An flowchart was created to determine how a user would navigate through the application to customize their avatar. A second iteration was created that shows the process of swapping between the profile and avatar customization sections.

Profile User Flow

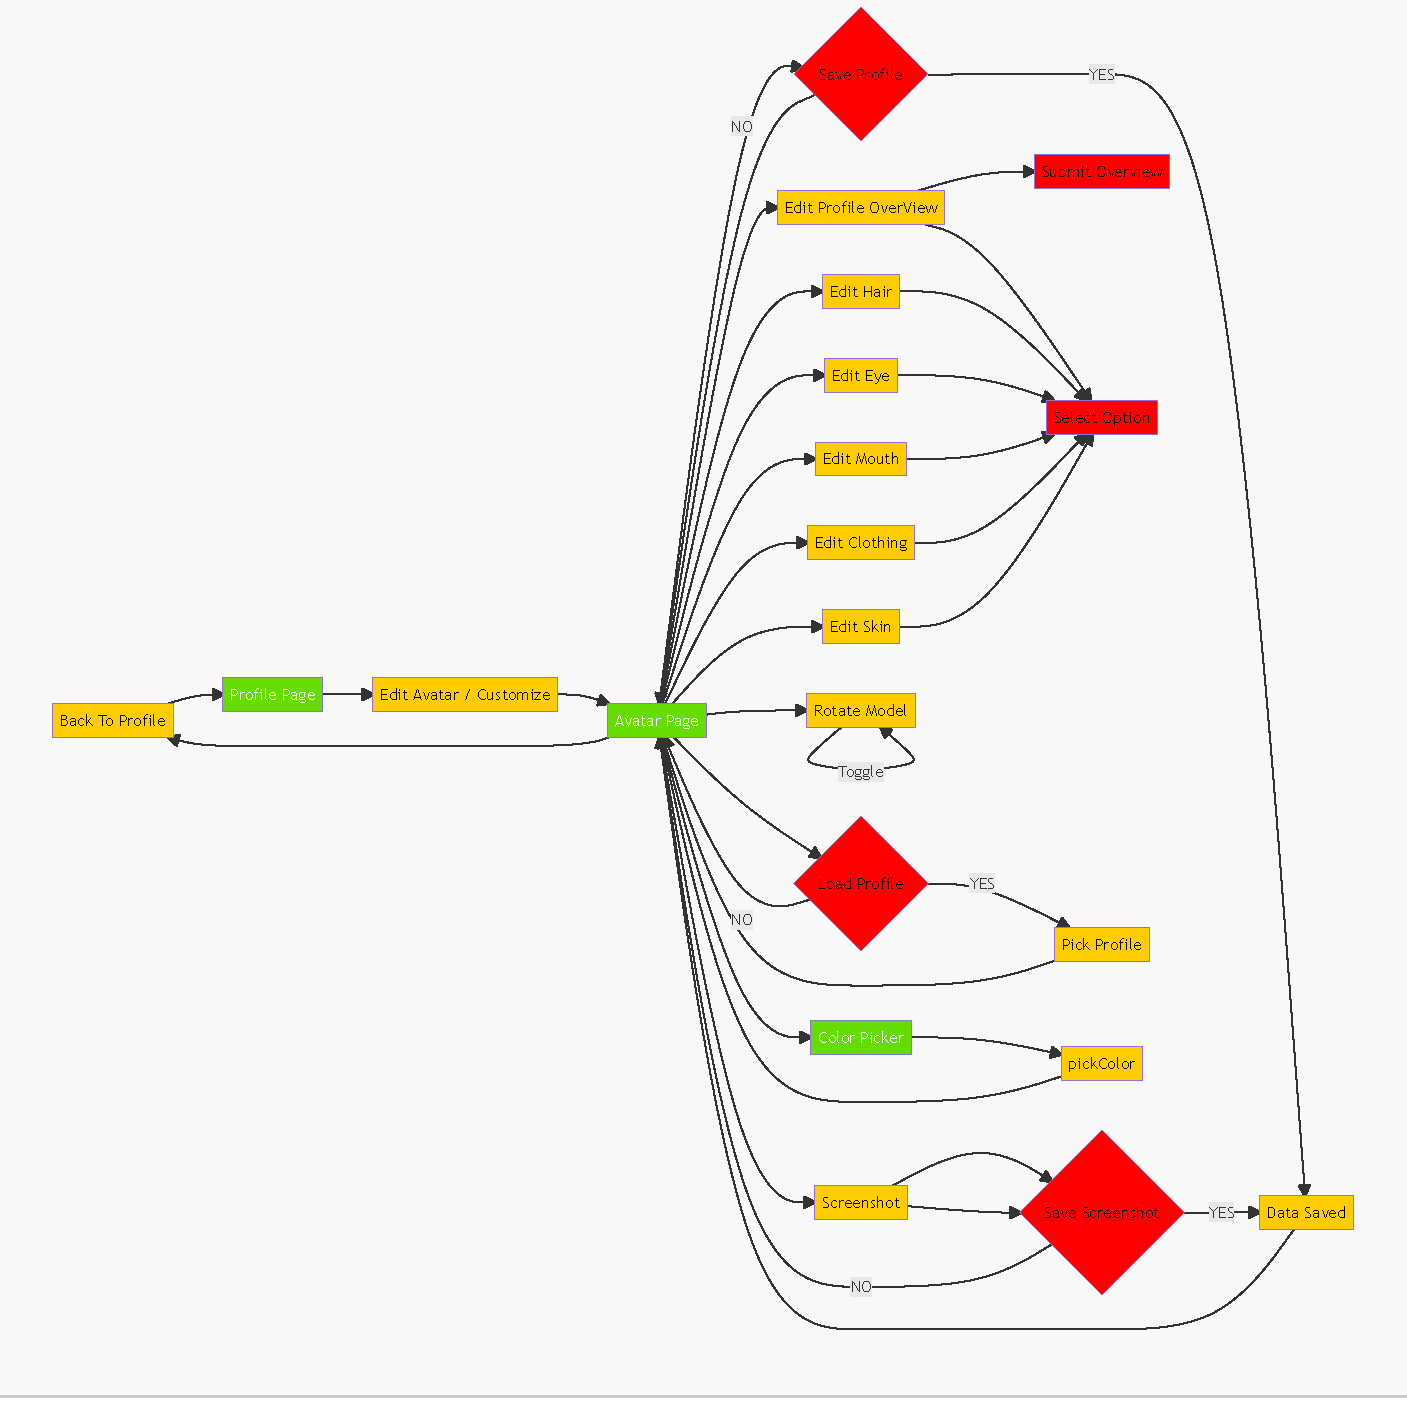
Avatar Customization User Flow. Users can swap between the Profile section and Customization section.

Design
Personas were created to gain a better understanding of target demographics and individual user needs. The personas represent different customer ages and consumer interests. Each persona contains content such as name, age, occupation, purchasing power (rich, middle-class, poor), and merchandise interests.
Designs of the models follow the image used for each persona. Components are streamlined, with emphasis placed on facial features and accessories such as different hair and clothing to distinguish models.

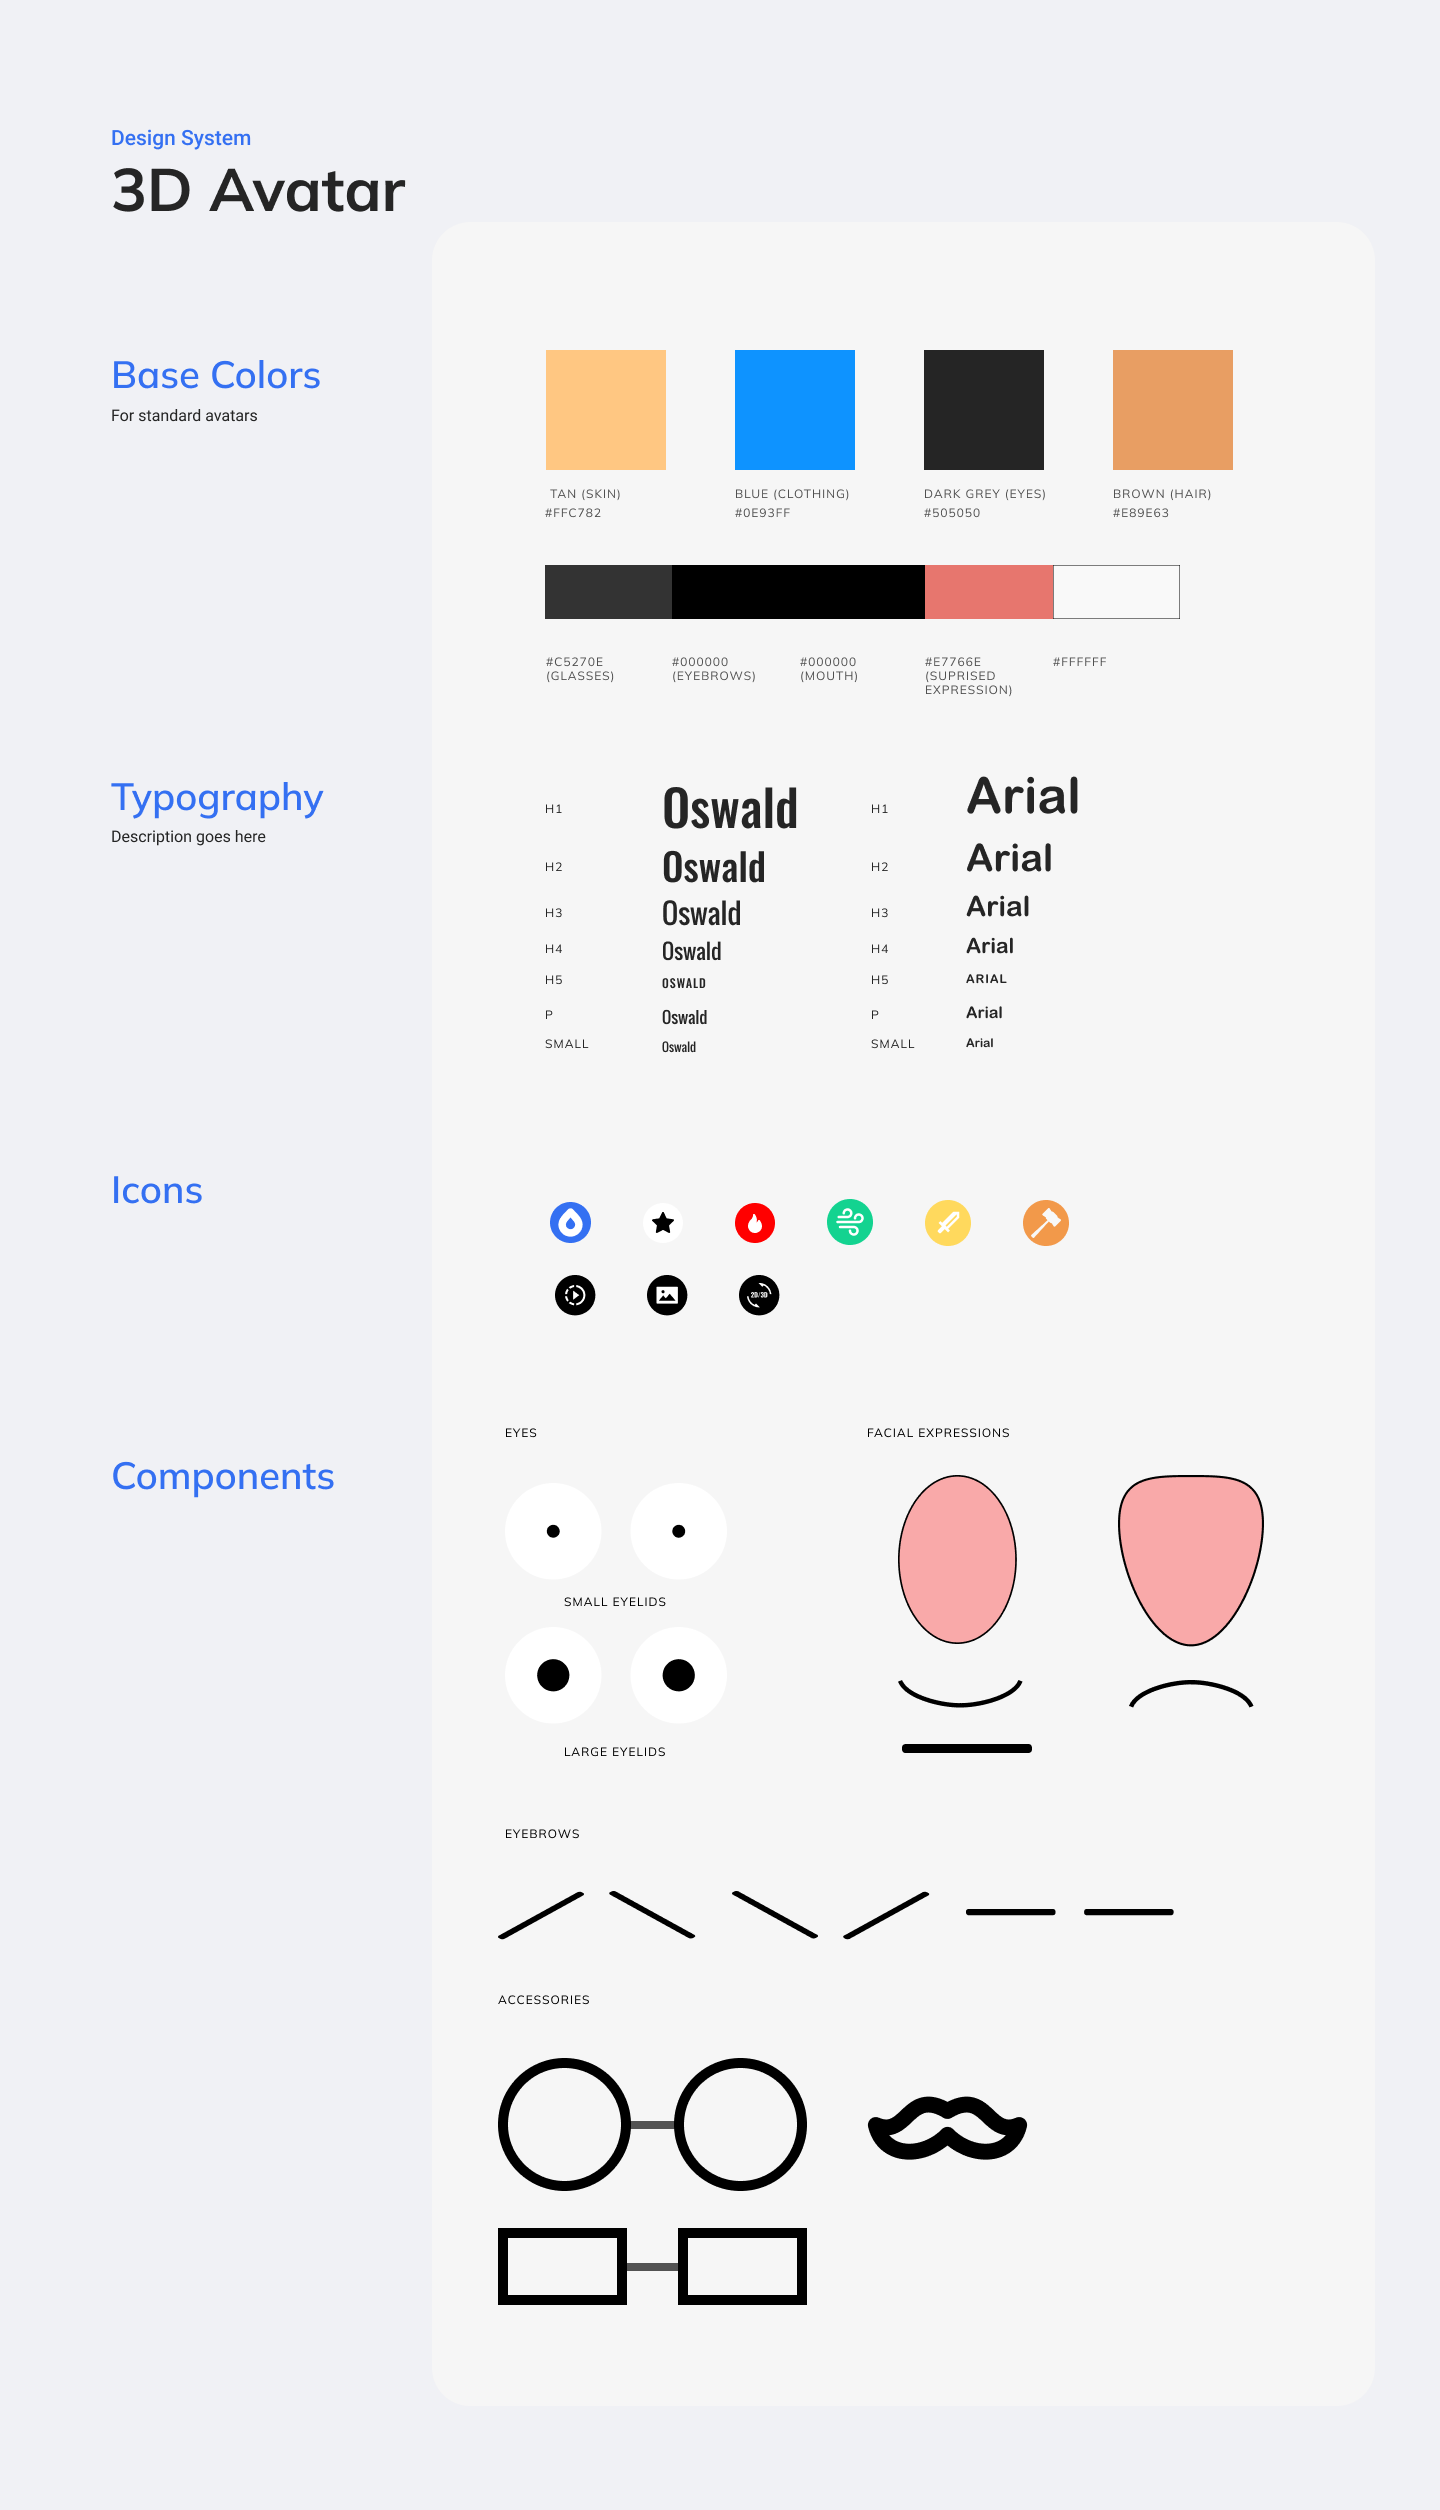
Stylesheet for color and avatar parts

A stylesheet was created to organize and determine the colors and components that are used for the avatars. Large, exaggerated facial features such as eyes and mouths were created to better convey emotions while maintaining a casual, friendly demeanor. Similar design principles were used for the colors and font. Single tone, bright colors and rounded, bold font were used to maintain simplicity and accessibility.
User Prototypes and Iterations
Figma Mockup
The profile section provides users with the ability to show their avatar, their interests and demographic information. For the initial prototype the focus was on designing an intuitive layout and to determine which components need to be made for the web version.
The customization menu appears as a popup window and is easily accessible at any time via a large “EDIT AVATAR” button located to the bottom right of the profile section. While in the Edit Avatar menu you can go back to the profile page by clicking the profile button in the top right of the screen.
The avatar customization screen is separated by three sections. The left section shows a preview of the avatar once customization options are selected. The top section shows a row of icons/tabs representing different areas of the avatar that can be customized such as hair, eyes, clothing, and skin. Each tab has a graphic and text heading for ease of navigation. The tab you are currently on is highlighted blue with a yellow border. The middle section shows rows of icons representing pre-set customization options you can choice to personalize your character.
For the figma mockup, model images were used as placeholder to demonstrate how the model will update when customization options are picked.
Images above show avatar customization menu options. The goal is to have rows of preset customization options that are easy to understand. 
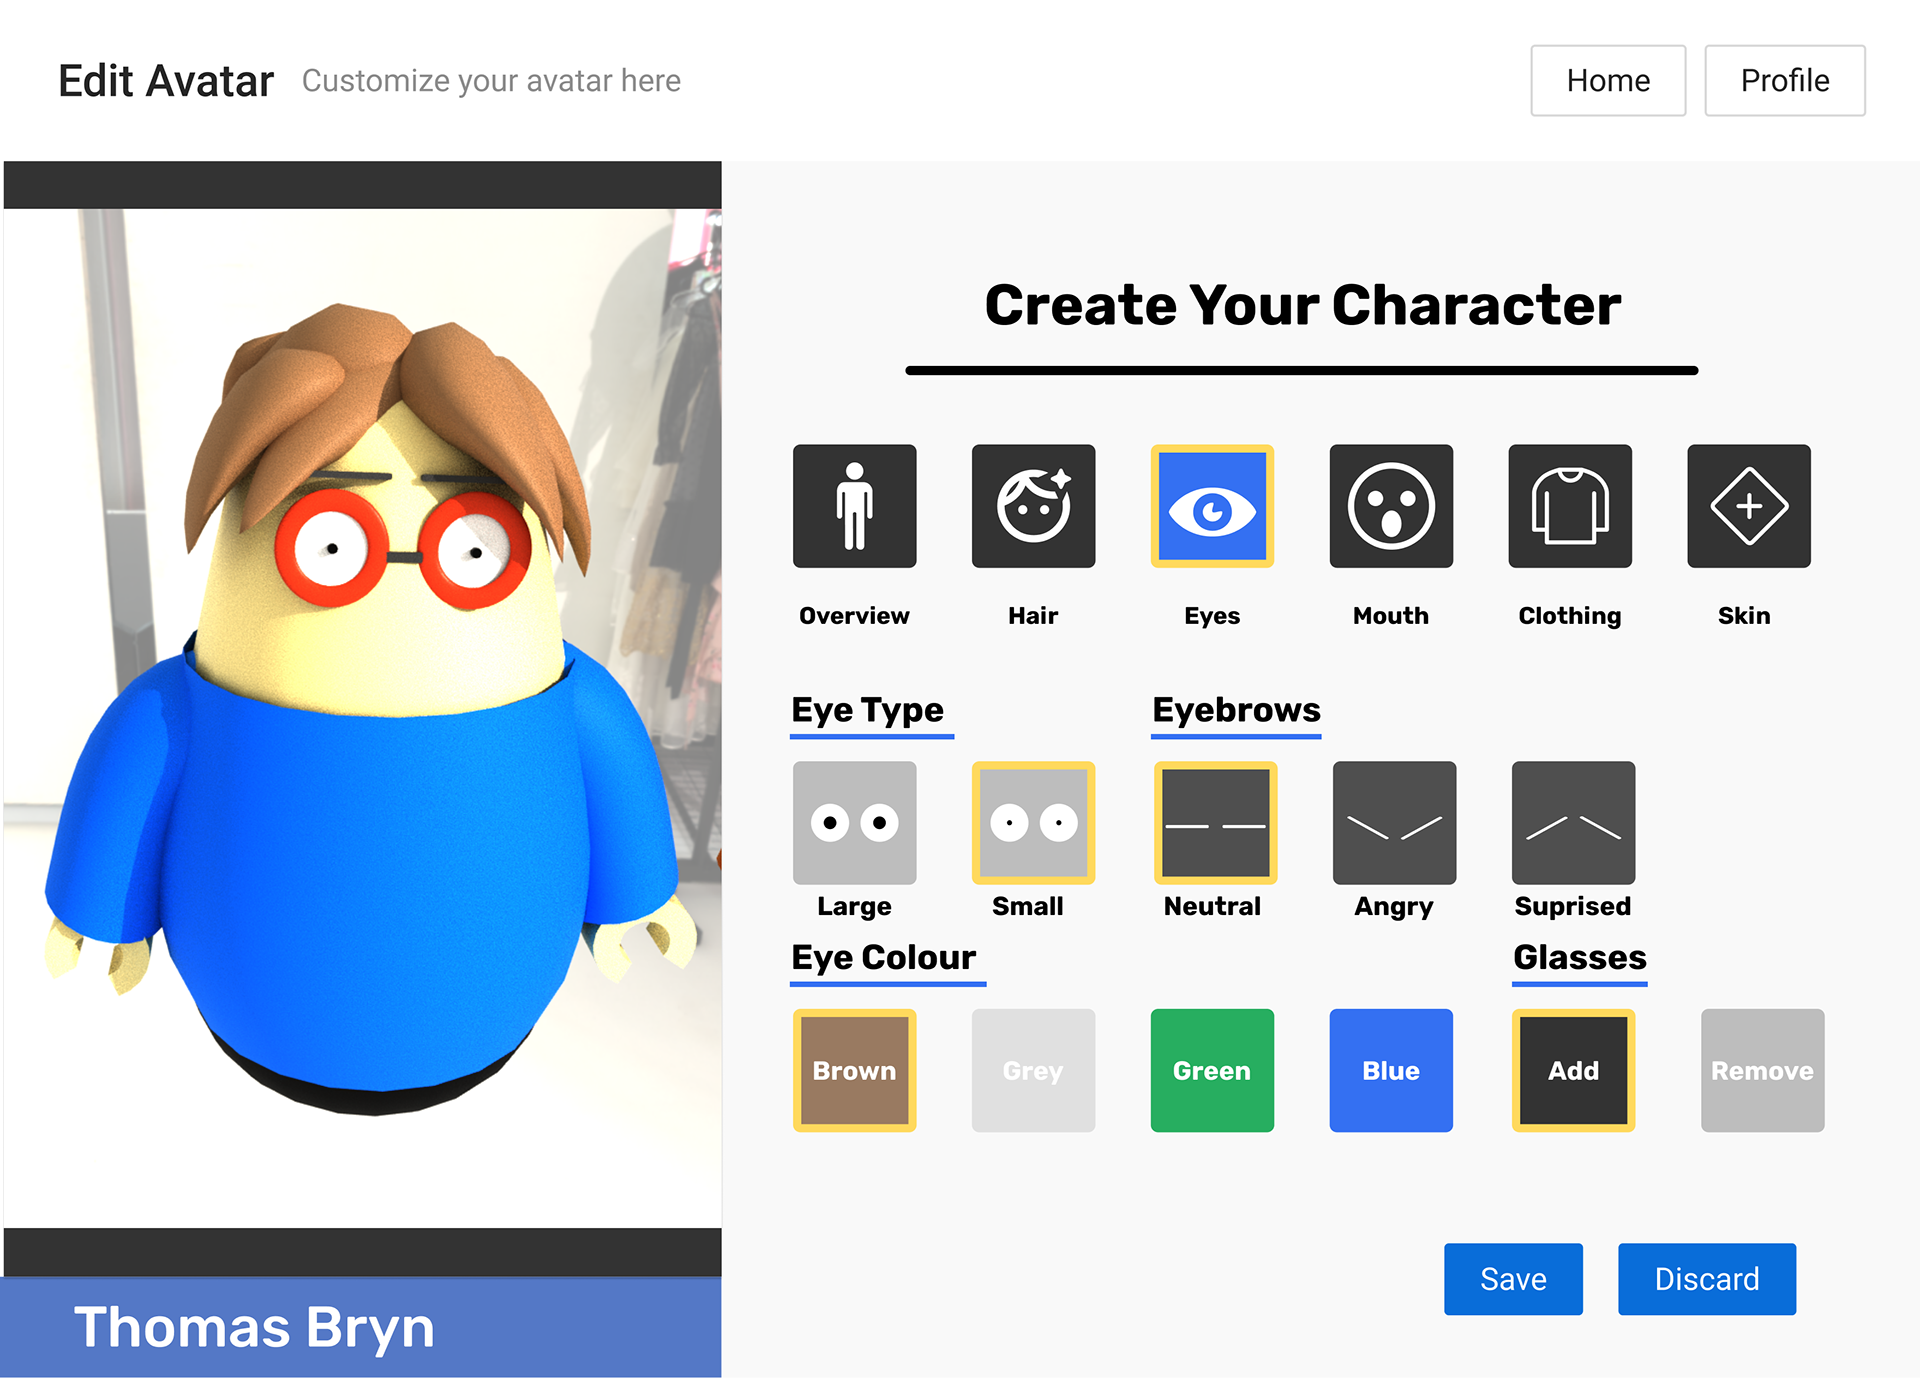
Figma prototype for Avatar creation and customization.
Recording of the Figma prototype for avatar customization 

  Web Version
Shown below are the various iterations of the web avatar/profile customization. Feedback from user testing and surveys is taken into account with each version. Additionally improvements are made to performance, customization options and visual fidelity with each update.
Version 1: Initial Site
The first version of the avatar customization page was developed using Bootstrap, JavaScript and Html5. The site is based on the layout from the Figma mockup.
Bootstrap was used to develop a responsive website and to easily structure content. 
Content is organized by title header, customization navbar, and individual customization options (icons) for each section. An interactable avatar is shown on the left side within the viewer. Users can change the appearance of the model in the viewer by selecting customization options on the right side. Later iterations of this site included additional options such as more colors for clothing.

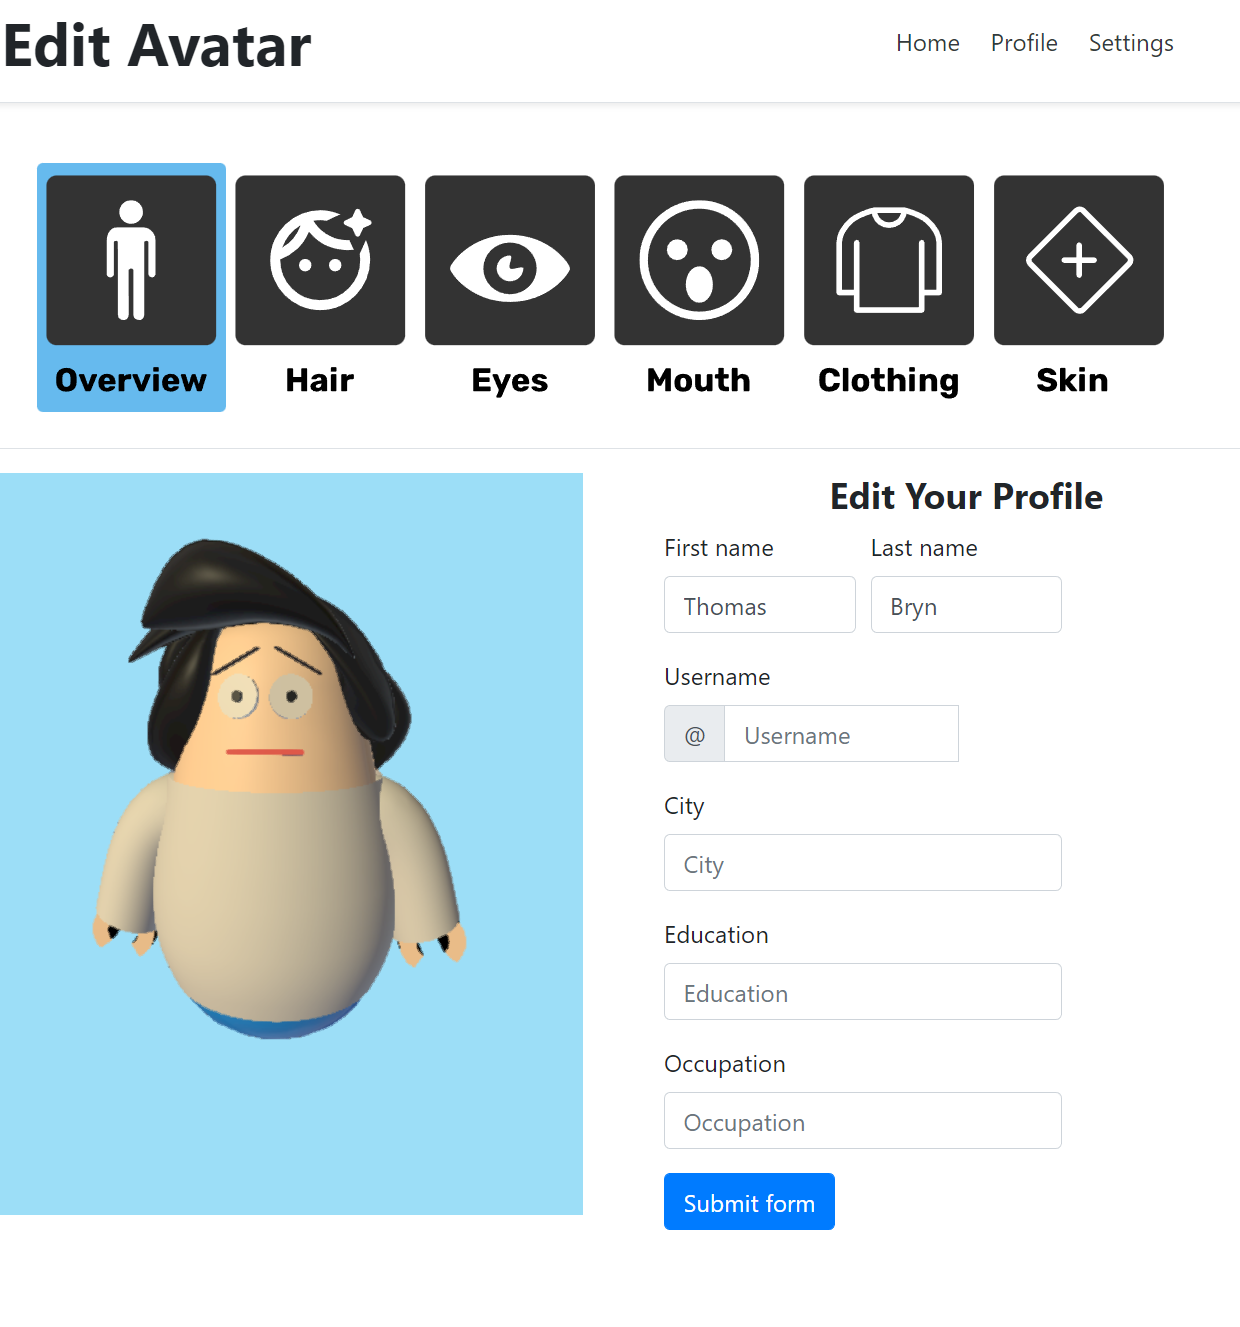
User can edit their profile demographic information.

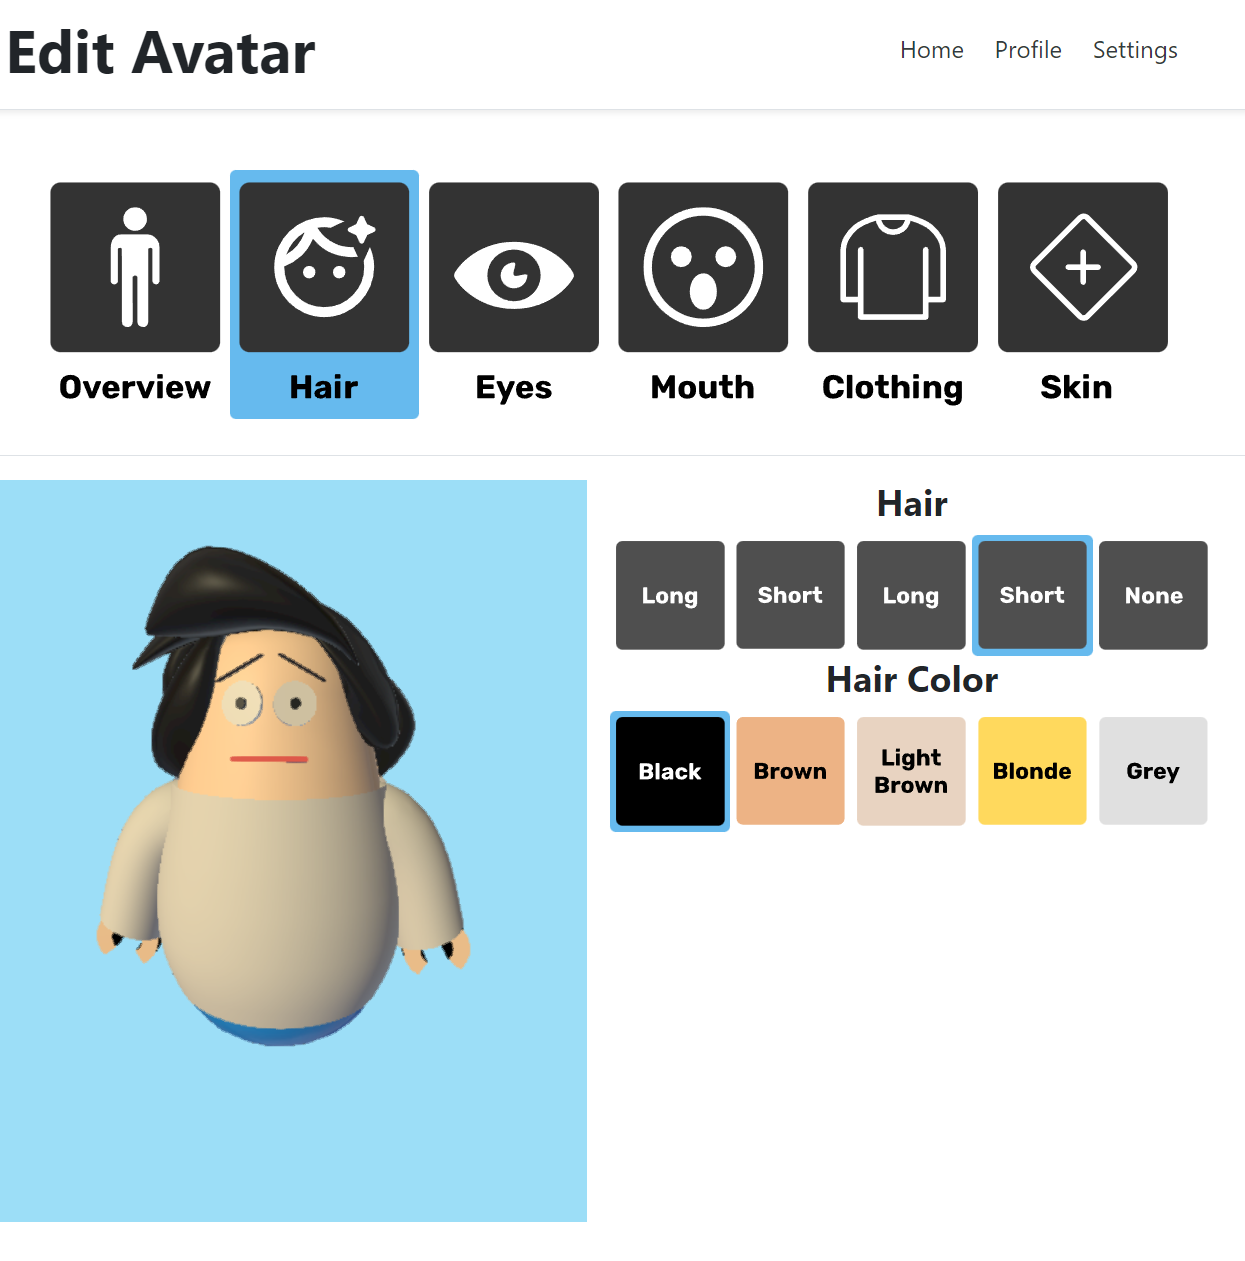
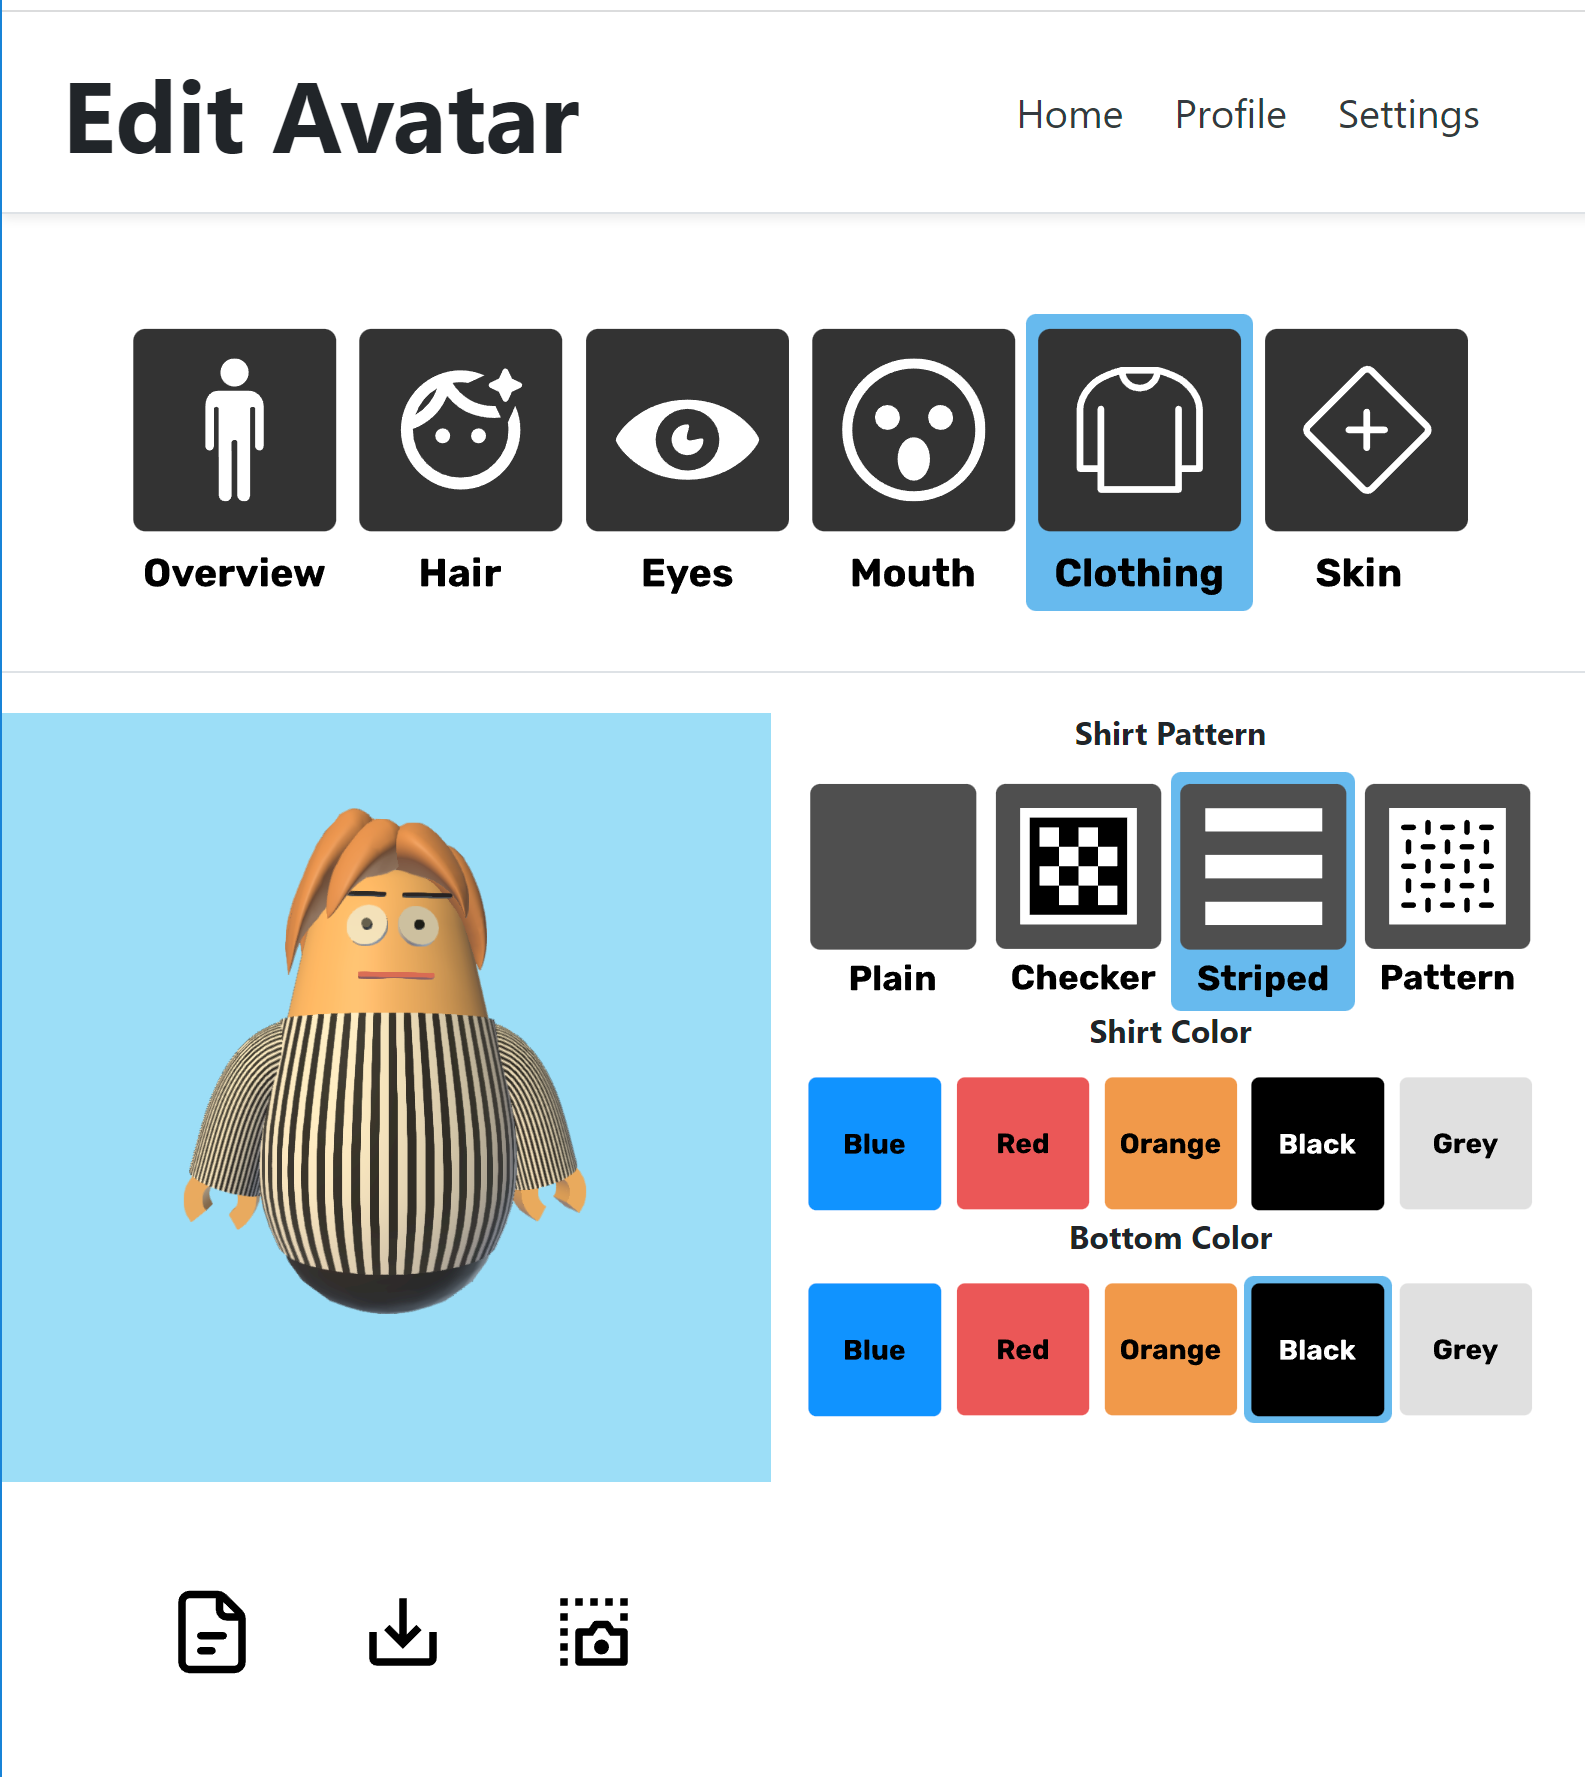
Users choose from various customization options per category to personalize their avatar.

Version 2: Customization Refinement and File Management
Users found the initial version of the site lacking in personalization options as well as a method to save their current progress.
Clothing patterns such as stripes or checkers were implemented to provide more visual variety.  Next, file management options such as loading, saving and a screenshot button were added. The save/load buttons allow users to save a local copy of the avatar to their computer for later. The screenshot feature takes a picture of the avatar in the viewer.
Improvements were made to the model viewer size and scalability to provide a more intuitive experience. A maximum size was set, and the viewer is more easily viewable on smaller screens.  

Users can save/load/screenshot the avatars created using the buttons located below the viewer

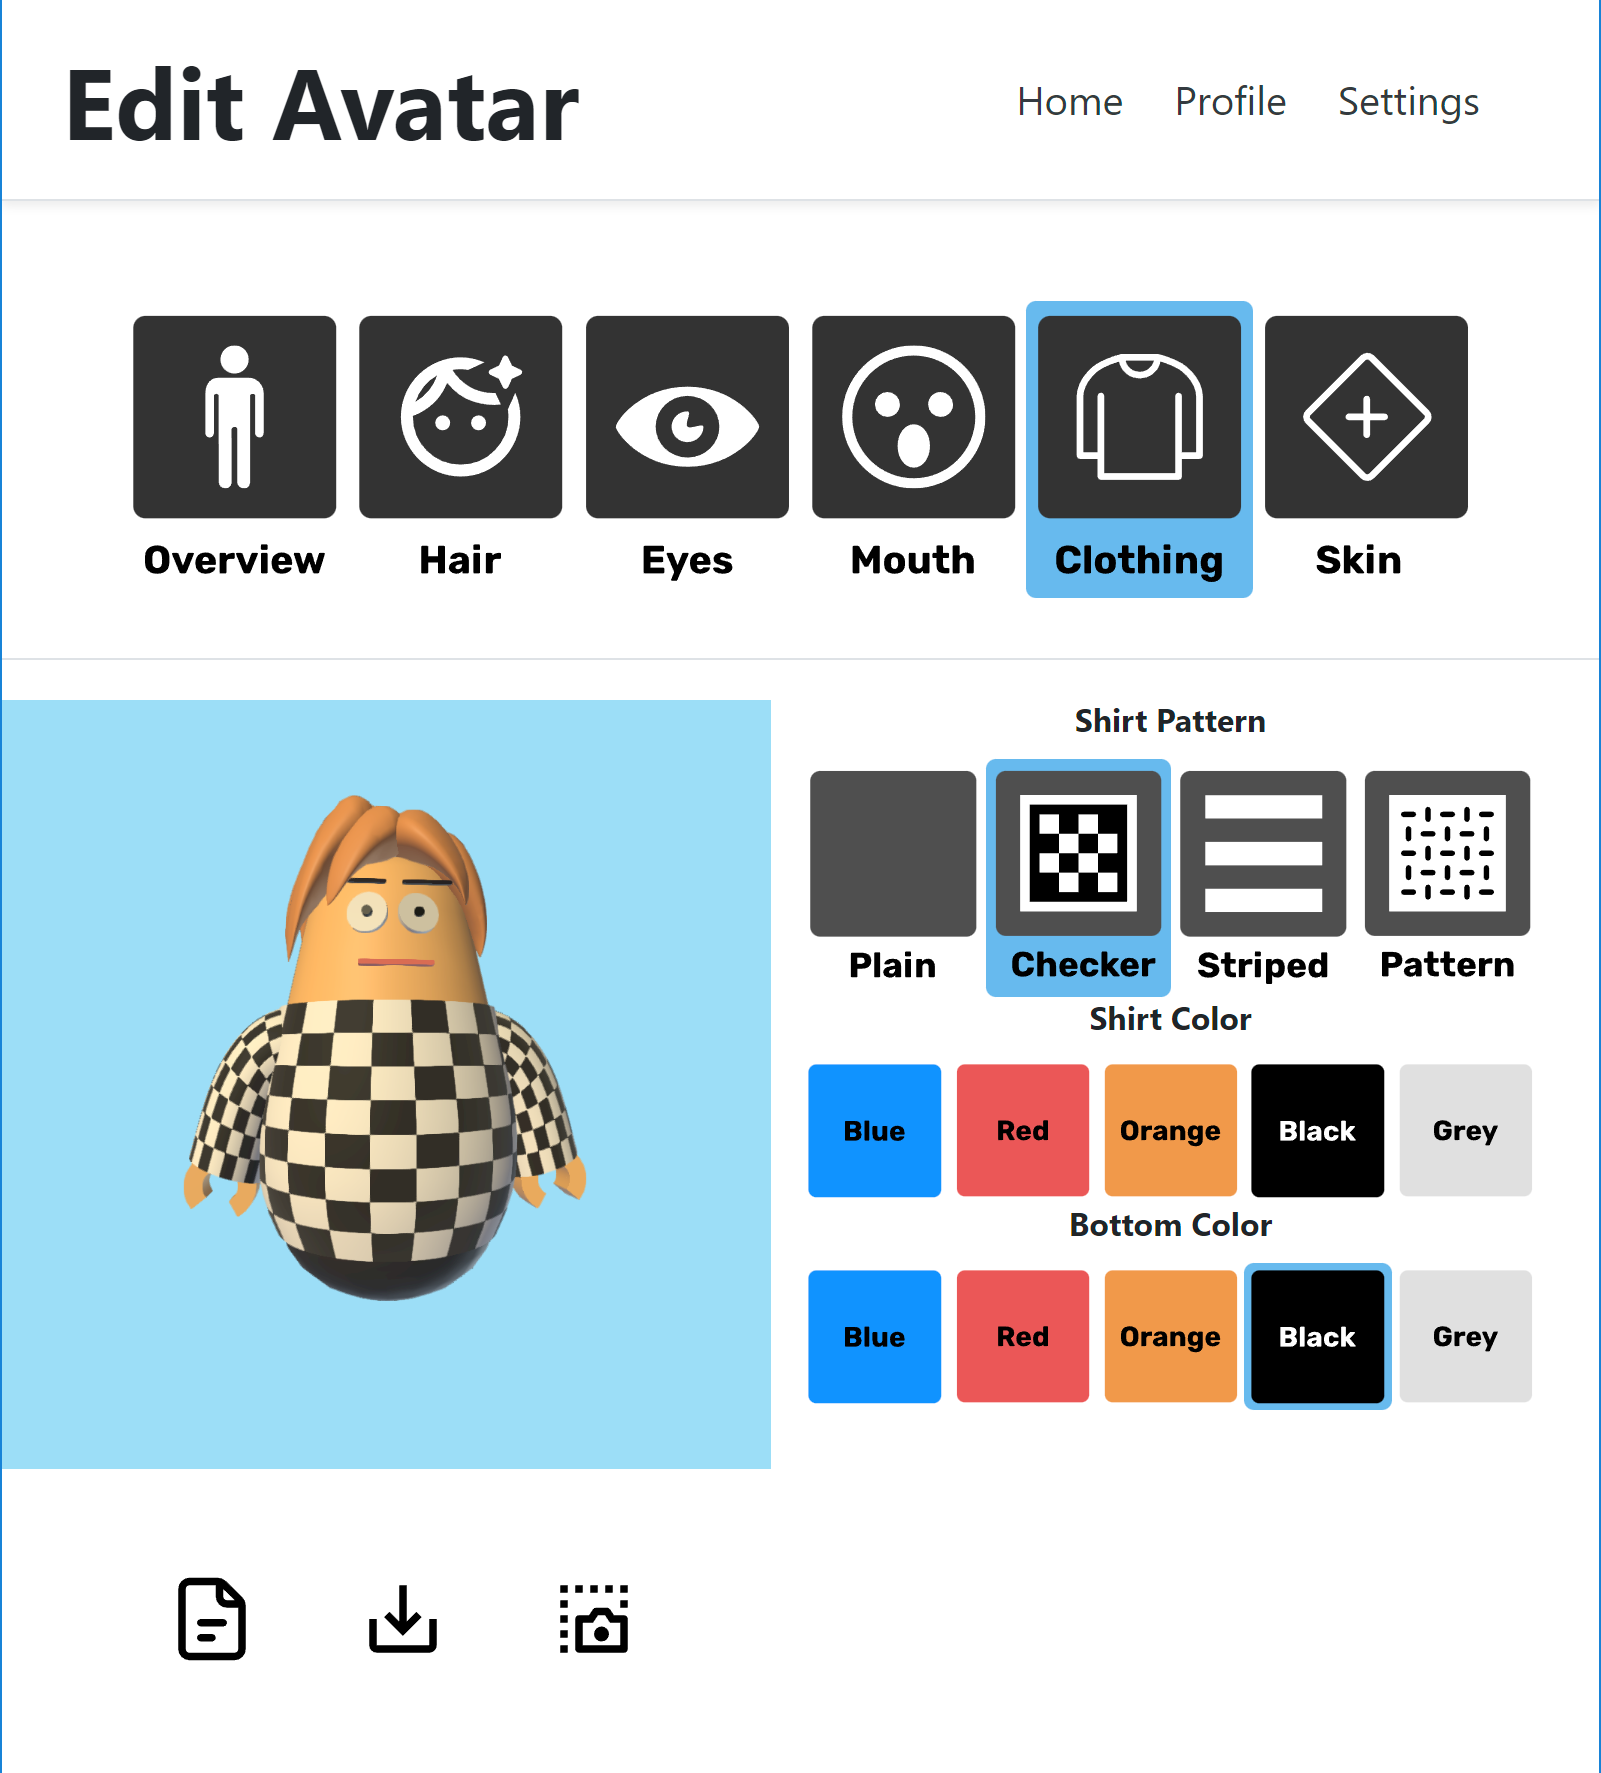
Additional clothing options were added following user feedback.

Version 3: Layout changes and Visual Improvements 
The current version of the website improves the content layout, adds additional customization options, and provides the ability to toggle between the profile and avatar customization sections.
During the latest round of testing users expressed the ability to view their avatar and avatar characteristics in a central location.
To accomplish this a profile section was created which uses a modified layout of the mockup created in Figma. 
Adjustments were made to this mockup by having the user swap between the avatar customization screen and the profile screen by pressing an Edit Avatar/Back to Profile button located on the title bar or through an Avatar Button on the profile page.
To improve readability, the layout of the avatar content was adjusted to match the profile section. The avatar customization main options bar was shifted to the right to be consistent with the profile layout. Icons were also reduced in size and are spaced more compactly. Less scrolling is required to see the available customization options in each section.
Accessibility improvements included a background color button and model rotation button for increased visual clarity.
Cosmetic additions added are texturing for clothing and additional color options for avatar parts. Individual icons such as hair options had preview images added to provide a more intuitive experience. Users can now better visualize avatars with the different hairstyles. ​​​​​​​

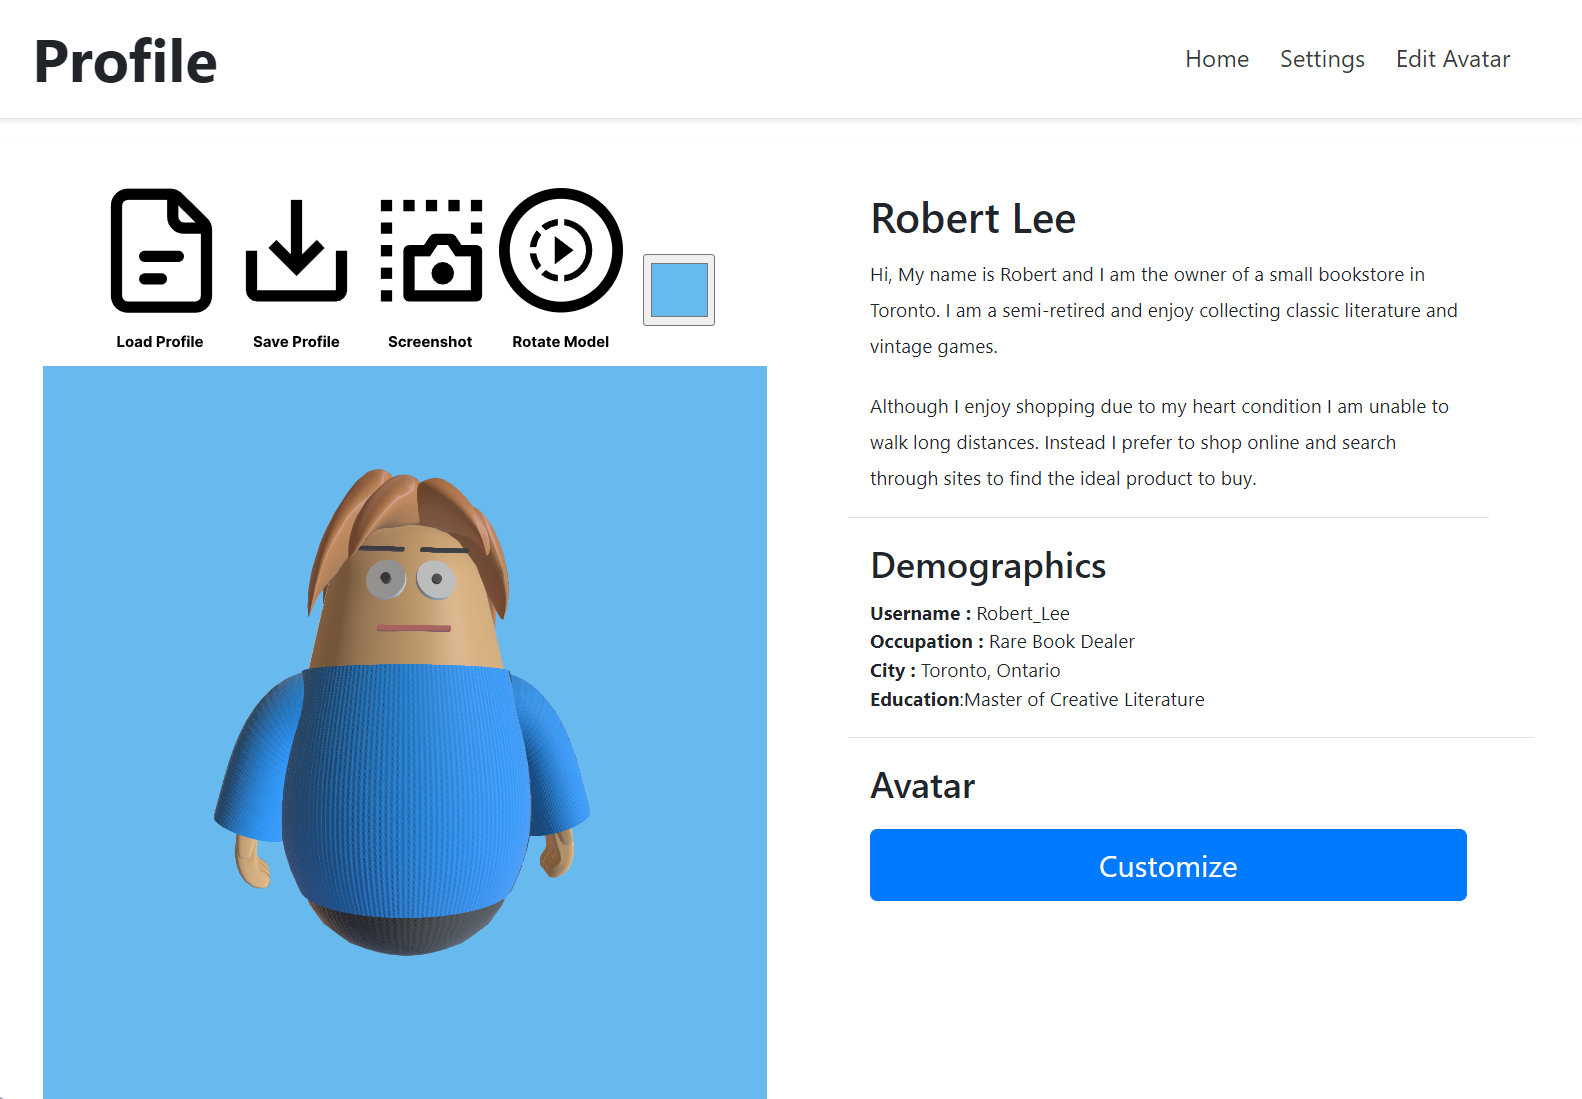
Users can swap between the Profile and Avatar sections by pressing the Customize button or the Edit Avatar button on the title bar.

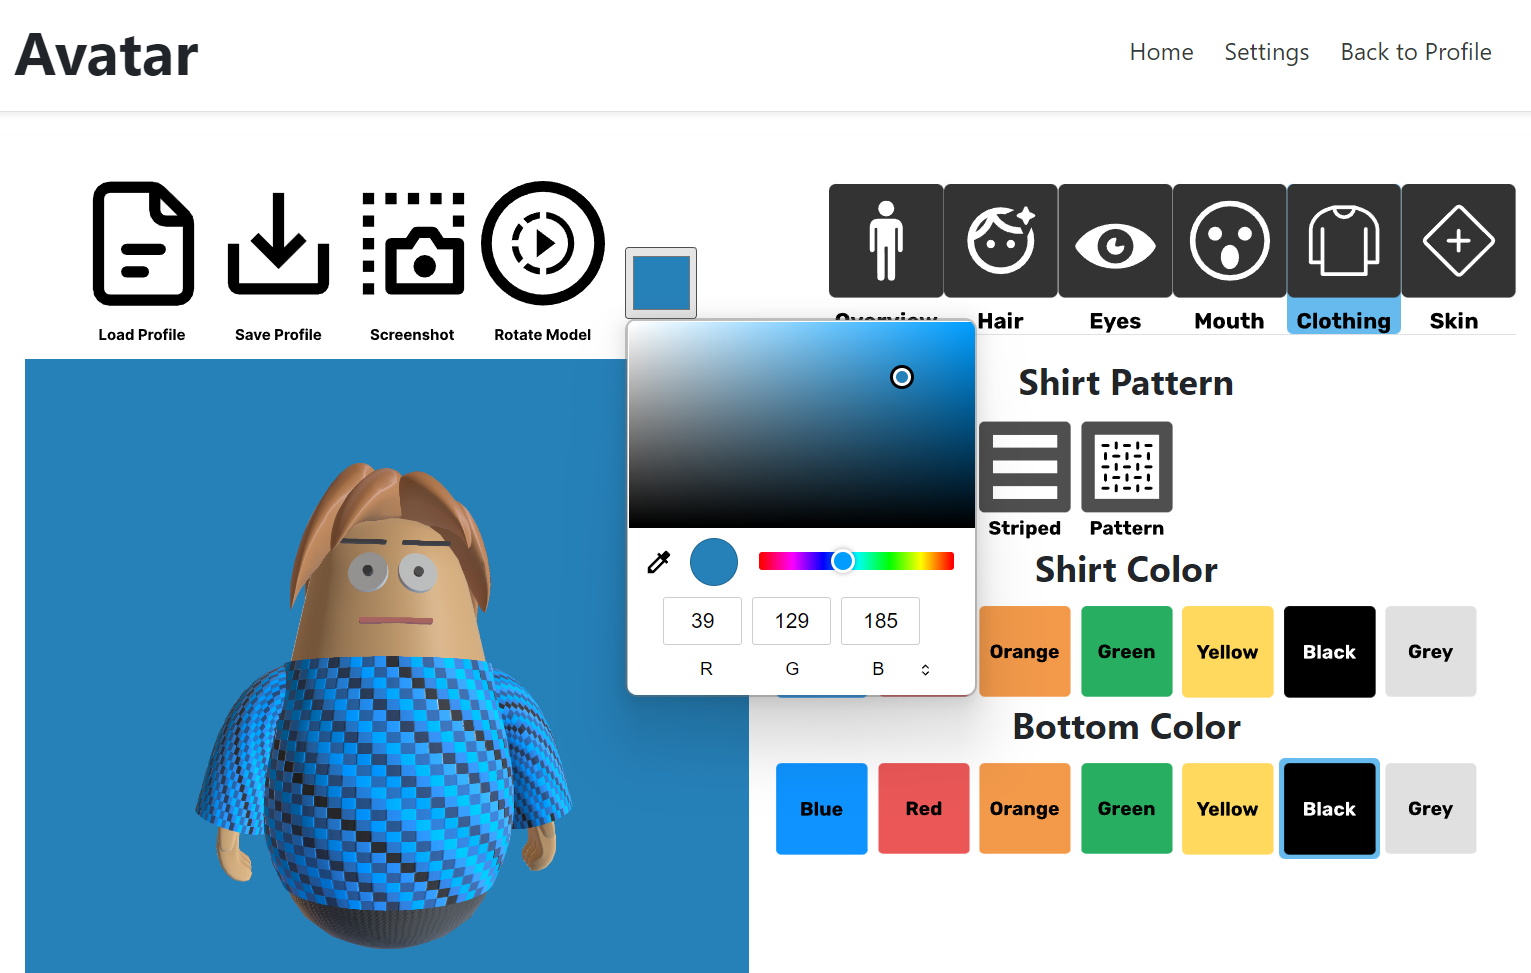
The color of the background can be changed at any time when adjusting the avatar appearance. Shirt patterns are more complex compared to previous versions.

  Website Demo
Shown below are videos demonstrating avatar customization and file management options for users.

The user customizes and saves their avatar. They then load the avatar into the viewer

This video shows the available customization options for avatar appearance and the user's bio page.

Back to Top